The calculation is used for geometrical and strength designs and worm gearing check. The program solves the following tasks.
1. Preliminary design of the gearing.
2. Automatic design of the transmission with a minimum of input requirements.
3. Design for specified safety coefficients.
4. Calculation of a table of proper solutions.
5. Calculation of complete geometric parameters (including center distance
adjustment, etc.).
6. Calculation of strength parameters, safety coefficients (SW, SH, Sδ,
SF).
7. Auxiliary calculations (heating, shaft design etc.).
8. Possibility of saving, loading, and comparing different solutions within the calculation.
9. Support for 2D and 3D CAD systems.
10. Creation of accurate 3D models (gear manufacturing).
The calculations use procedures, algorithms and data from standards ANSI, ISO, DIN, BS and specialized literature.
List of standards: DIN 3996:2019, DIN 3974-1, DIN 3974-2, DIN 3975-1:2002, DIN 3975-2:2002, ISO 10828:2024, ISO/TS 14521:2020, ČSN 01 4750:2005, ANSI/AGMA 6134-C21, ANSI/AGMA 6034-B92, ANSI/AGMA 6022-D19
Literature:
[01] Industrial Press, Inc.: Machinery’s Handbook 26th Edition
[02] McGraw-Hill: Shigley’s Mechanical Engineering Design, Eighth Edition
[03] Roloff /Matek: Maschinenelemente, 21. Auflage
[04] AGMA, TECHNICAL PAPERS: DIN 3996: A New Standard for Calculating the Load
Capacity of Worm Gears
[05] SVATOPLUK ČERNOCH: Strojně technická příručka
[06] RUDOLF KŘÍŽ, PAVEL VÁVRA: Strojírenská příručka
![]()
User interface.
![]()
Download.
![]()
Purchase, Price list.
Information on the syntax and control of the calculation can be found in the document "Control, structure and syntax of calculations".
Information on the purpose, use and control of the paragraph "Information on the project" can be found in the document "Information on the project".
Worm (globoid) gearing can transmit high outputs, the common ones being 50 to 100 kW (optimum 0.04kW-120kW, extreme 1000 kW); within one stage, it is able to realize high transmission ratios i = 5 to 100, (up to i=1000 in kinematical transmissions), being of small size, low weight, and compact structure. It features quiet and silent operation and can be designed as a self-locking transmission.
The disadvantage is the large slip in the gearing causing higher friction losses and thereby lower transmission efficiency; the endeavours for improvement require using deficit nonferrous metals for wormgear rims. Gearing production is more demanding and expensive and the service life of such gearing is usually shorter than in rolling gearing.
Worm gearing is used for power transmission in mixers, vertical lathes, vehicles and lifting equipment, textile machines, presses, conveyors, shears, drums, hoists, ship propeller drives, planers, machine tools, cars...
This calculation deals with the most frequently used gearing with cylindrical worm and globoid gear.
Worm gearing is a special case of screw gearing with the angle of axes 90° and a low number of pinion/worm teeth (mostly z1=1-4). Worm gearing types are distinguished by shape as follows:
The formulas given in this article are used in geometry calculation.
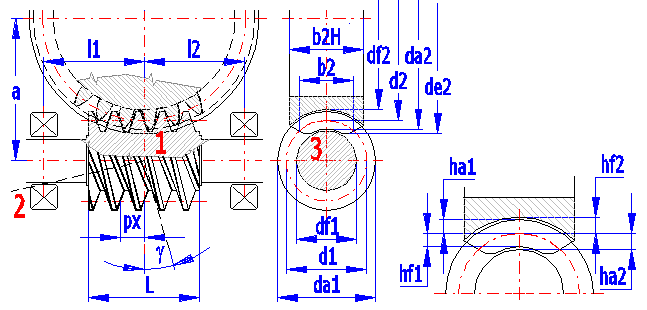
1- Centre-line section (mx,ax,sx,ex) , 2-Normal section (mn,an,sn,en), 3-Worm frontal section
Worm basic profile parameters: m (DP for calculation in inches),a,ha*,c*,rf* Module and pressure angle in the centre-line section are selected for spiral gearing ZA, while module and pressure angle in the normal section are selected for common gearing ZN,ZI,ZK,ZH.
Worm and worm gear parameters: z1, z2, x1=0, x2=x
ZA: df1=d1 - 2 •
(ha* + c*) • mx; df2=d2 - 2 •
(ha* + c* - x) • mx
ZN: df1=d1 - 2 • (ha* +
c*) • mn; df2=d2 - 2
• (ha* + c* - x) • mn
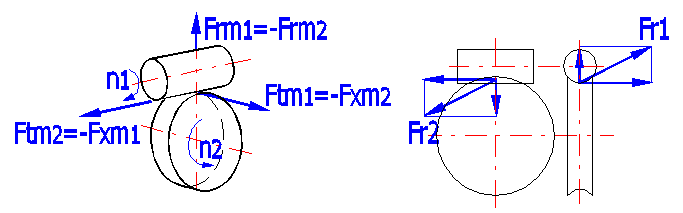
The following formulas are used to calculate the forces occurring in toothing.
Pw1 = Pw2 / ηges
Mk2 = 30/PI() •
(Pw2 / n1) •
(z2 / z1) •
1000
Mk1 = Mk2 / ((z2 / z1) •
ηges)
Ftm1=2000 •
T2 / (dm1 •
ηges •
z2 / z1) = -Fxm2
Ftm2=2000 •
T2 / dm2 =-Fxm1
Frm1 = -Frm2 = Ftm1 •
tan(a)
/ sin(g + r)
Fr1 = (Ftm1^2 + Frm1^2)^0.5
Fr2 = (Ftm2^2 + Frm2^2)^0.5
Mb = Ftm2 • ((d1 / 1000) / 2)
FMb = Mb / ((l1 + l2) / 1000)
RA = l2 • F / (l1 + l2) + FMb
RB = l1 • F / (l1 + l2) - FMb
Total loss of power in worm transmission consists of gearing, bearing and sealing losses. The calculation neglects any losses associated with the lubrication system and transmission cooling. Gearing efficiency is defined as a ratio of the driven and driving members and differs if the worm (index 1) or the wheel (index 2) is the driving member.
Efficiency of gearing: hz = tan(g) / tan(g + rz)
where:
g...lead angle
r...friction angle r=atan(m)
As the lead angle increases (with given friction angle), efficiency rises quickly at first to change into a flat curve and drop quickly again (see the Figure).
The curve peak is in the middle of the interval [0; 90-r] and the theoretical maximum efficiency of a worm gearing is then calculated as follows:
hmax = tan(45-r/2) / tan(45+r/2)
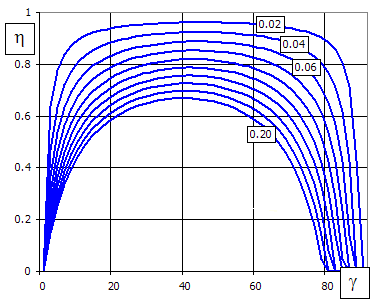
The vertical axis shows gearing efficiency, the horizontal axis shows the lead angle, and individual curves are for different friction coefficients.
In practice, lead angles up to 10° and up to 20-25° are used for worms ZA and for common worms ZN, ZI respectively, namely for production reasons. Endeavours after the highest possible efficiency then result in using higher lead angles, which can be achieved by reducing worm diameter and using multiple worms.
This design is virtually not used in power transmissions.
Efficiency of gearing: hz = P1 / P2 = tan(g - r) / tan(g)
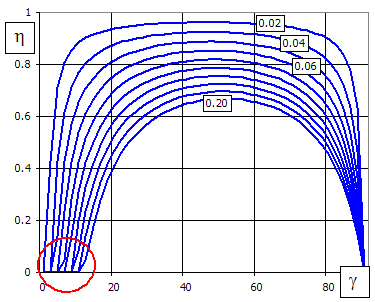
In this case, the point of intersection of the curve with the horizontal axis (red circled), which defines the self-locking limit, is important. It is the moment when gearing cannot be moved using even the highest possible torque acting on the worm gear (this feature is used in lifting mechanisms, for instance). The self-locking limit occurs when the lead angle equals to the angle of friction.
In practice, the following self-locking features are used as a minimum:
Friction coefficient has the highest effect on transmission efficiency. It depends on a number of parameters (material, surface, lubricant, speed, size). It is calculated using the following formula:
DIN:
mzm = Ψ
•
mGr + (1 - Ψ)
•
mFl; line
calculation [6.2-6.12]
ISO:
mzm = m0T •
YS • YG • YW •
YR; line calculation [6.13-6.18]
Total efficiency includes bearing, sealing and no-loads losses and is calculated using the following formula:
hges = Pw2 / (Pw2 + PV), where PV is total power loss; line calculation [6.22-6.26]
Abrasive loss of material occurs during gearing operation, which means that tooth thickness is reduced. This predominantly affects the tooth side made of a material of lower hardness (wheel as a rule). A number of tests were performed recently with different materials, dimensions and oil types, giving the results as shown on the Figure.
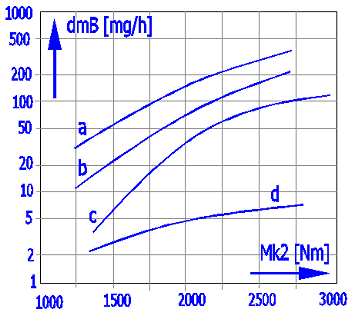
Worm: 16MnCr5E; Wheel: CuSn12Ni-GZ; a=160mm; n1=500; i=20
Curves:
Mineral oil: a) n40=220 [mm2/s]; b)
n40=460 [mm2/s]; c)
n40=680 [mm2/s]
Synthetic oil: d) EO:PO=0:1
As follows from the results, using synthetic oils reduces wear fundamentally. Oil viscosity has an effect in mineral oils only; wear increasing significantly with low viscosity.
The allowable worm gear wear δWlimn depends primarily on the device in which
the worm gear is used. It can be determined, for example, by the maximum
backlash in the gearing. In any case, however, a limit wear value is reached at
the edge of the tooth pointing (a).
If specific conditions are not agreed upon, (d) - allowable backlash in the
gearing - is often used.
Wear is directly dependent on the required service life Lh.
In the selection box, it is possible to choose from the following conditions:
- Custom δWlim value.
- a) Wear leads to pointing of the gear tooth tip, and further wear leads to a
reduction in tooth height.
- b) Wear leads to tooth weakening and eventually to its breakage (SF<1.1).
- c) Wear leads to an allowable (agreed) weight loss of the worm gear (mass
wear). This value can be used, for example, if you monitor the weight of bronze
dust during an oil change. The loss is determined on the previous line.
- d) Wear leads to the commonly used backlash in the gearing δWlim=0.3 • mx •
cos(gm), roughly 30% of the maximum value.
SW = dWlimn / dWn ≥ SWmin (SWmin=1.1)
It can be influenced (increased) by choosing lower service life required [2.12], oil of higher grade, higher viscosity [2.7,2.8] and, of course, through the choice of geometrical parameters.
Fatigue cracks occur on the tooth surface through the pulsating load of the tooth side and through the action of sliding friction forces. Oil penetrates into these cracks and hydrostatic forces cause tearing off of surface particles and pitting. The following graph shows pitting occurrence as a function of the load cycles and centre-line distance. The pitting occurrence calculation formula is based on a number of test results and operation experience.
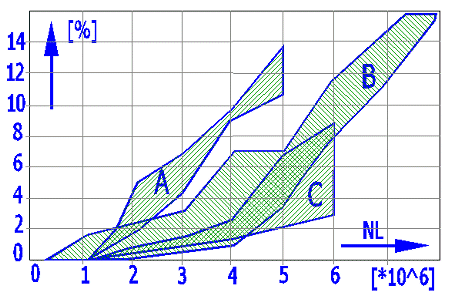
Horizontal axis: load cycle - wheel; vertical axis: [%] of pitting area from tooth side area
Worm: 16MnCr5E; Wheel: CuSn12Ni-GZ; Syntetický olej;
n1=500;
i=20; dHm
= 330 MPa
Curves: A) a=160 [mm]; B) a=100 [mm];
C) a=65 [mm]
The following basic formulas are used to check safety:
![]()
SH = sHG / sHm ≥ SHmin (SHmin=1.0)
It can be influenced (increased) by choosing lower service life required [2.12], oil of higher grade [2.7] and, of course, through the choice of geometrical parameters.
Too great and dynamically changing worm deflection may result in interferences and thereby in increased wear.

![]()
The value of permissible deflection was achieved from practical experience.
Sd = dlim / dm ≥ Sdmin (Sdmin = 1.0)
If too high stress on the tooth root occurs, gear teeth suffer plastic deformation resulting in a shift in the contact area and subsequent breaking of the tooth. Research studies and tests of tooth root stress were performed for different centre-line distances, transmission ratios, diameter quotients and different materials. The Figure shows test results and values calculated as per DIN 3996.
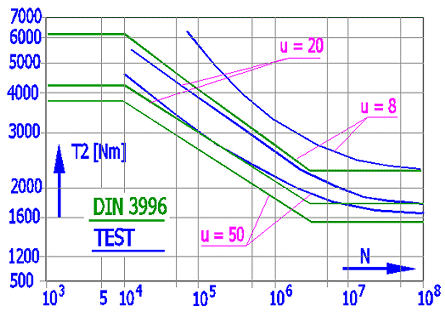
Horizontal axis: load cycle – wheel; vertical axis: output torque
Worm: 16MnCr5E; Wheel: CuSn12Ni-GZ; Synthetic oil; a=120,u=8/20/50.
Green: calculation to DIN, Blue: test result, failure probability 50[%]
The tests show that the output torque moment causing tooth damage reduces with the transmission ratio increase. This moment increases with reduced load cycle. At the same time, the tests show that permanent plastic deformation occurs before tooth breakage in bronze wheels.
tF = Ftm2 / (b2H • mx) • Yeps • YF • Yg • YK
tFG = tFlim • YNL
The value of maximum permissible output to AGMA was used as an input value to calculation to DIN for the purposes of the following graphs.
Worm: 16MnCrSEh; Wheel: GZ-CuSn12Ni; polyglycol (EO:PO=0:1); a = 180 mm; u = 50/2; L = 25000 h
Worm: 16MnCrSEh; Wheel: GZ-CuSn12Ni; polyglycol (EO:PO=0:1); a = 180 mm; n1 = 500 rpm; L = 25000 h
Worm: 16MnCrSEh; Wheel: GZ-CuSn12Ni; polyglycol (EO:PO=0:1); u = 50/2; n1 = 500 rpm; L = 25000 h
When designing a gearbox, one should also consider the heat generated inside the gearbox (efficiency of gearing, friction of bearings, and friction in sealing). This parameter is not so important in spur or bevel but it is in worm gearing. As worm gearing efficiency is lower considerably than that of spur or bevel gearing, considerably more heat is generated in the gearing and has to be removed. Therefore, thermal safety has great importance for a correct design to ensure gearbox function within the permitted temperature range of oil. Thermal design/safety tends to be one of the limiting factors when designing transmissions.
In addition to an approximate formula for heating calculation as per DIN 3996, this calculation also includes a simple temperature analysis. This analysis makes it possible to calculate the heat passing through the gearbox walls and the heat removed by oil cooling. For designs of important transmissions it is in any case recommended to make a detailed thermodynamic analysis, best in connection with pertinent tests.
Two fundamental formulas are used in this temperature analysis, namely:
P = k • A • dT
where:
P..... power losses [kW]
k..... combined heat transfer coefficient (heat transmission, radiation)
[W/m2*K]
A..... gearbox outer surface [m^2]
dT... temperature difference between oil and ambient air temperature [°C]
A number of recommendations can be found in the literature for coefficient k determination. Selected values are provided in the Article [11.15].
Basic area A is given by the calculation as a minimal right parallelepiped free from any projections and ribbing, which comprises the designed gearing. The ribbing effect is then established by means of a coefficient.
P = c • ro • Q • dT
where:
P.....cooler power [kW]
c.....oil specific heat [Ws/Kg/°K]
ro... oil density [kg/dm3]
Q... oil volume [litre/s]
dT.. temperature difference between oil leaving the gearbox and cooled oil
re-entering the gearbox.
Gear transmissions are split into:
Power gearing – The gearing intended predominantly for power transfer and transformation must be designed/checked for strength (e.g. machine drives, industrial gearboxes…).
Non-power gearing – No strength design/check needs to be performed in gearing where the torque moment is minimal given the wheel size (e.g. instrumentation, regulation equipment...).
Any worm gearing design provides considerable liberty in selecting gear diameters and width. Therefore, the calculation makes it possible to create a table of proper solutions to pick from a number of parameters, such as weight, centre-line distance, efficiency, etc.
The result of this procedure is a table of proper solutions of the gearing being designed.
Although the solution table provides correct proposals, it is advisable to optimize and fine-tune some parameters, namely centre-line distance [4.23,4.24] and worm bearing distance [4.16,4.17].
The following procedure is most appropriate in power gearing:
An auxiliary calculation [16.0] can be used for non-power gearing.
No strength parameters need to be addressed and checked when designing a non-power gearing. Therefore, directly select the proper number of teeth and a module [4.8-4.20] and check the dimensions of the gearing being designed.
In this section, select / enter:
- Calculation units.
- The standard according to which the calculation is performed.
- Basic input parameters of the proposed gearing.
In this section, you can also:
- Perform a preliminary design of gearing dimensions (mx, DP, d1, d2, da1, da2, efficiency, center distance ...).
- Use the conversion of various unit types used in this calculation.
In the list box, select the desired system of calculation units. All values will be recalculated immediately after switching to other units.
It is possible to choose between DIN and ISO standards. Design and checks will be performed according to the selected standard.
For comparison, sections [12, 13] also include the calculation according to AGMA, which is simpler.
Select the driven element from engine (worm or gear) in the list of options.
Enter the required power on the worm gear. The common values range from 0.1 to 300kW / 0.14-420HP, in extreme cases up to 1000kW / 1400HP. Using the right push-button, calculate the maximum power the particular worm gearing is able to transmit.
Enter the worm speed. The common worm speed is up to 3000 rpm, while extreme speed may be up to 40000 rpm. Worm gear speed is calculated from the number of teeth of both gears.
It is the calculation result and cannot be entered.
The optimum transmission ratio ranges between 5 and 100. In extreme cases, it may reach up to 300 (1000 in non-power gearing). Transmission ratio is entered in the left entry field using the keyboard.
The roll-out menu on the left offers the recommended transmission ratio values; when choosing from this menu, the selected value is added to the left field automatically.
Since the actual transmission ratio is the proportion of the number of teeth of both gears (integers), the actual transmission ratio will mostly differ from the required (entered) one. The value of the “Actual transmission ratio” is shown on the left, while the percentage deviation from the required one is given on the right.
The preliminary design can help you with basic orientation. To determine the gearing parameters precisely, use sections [2.0-4.0].
Click the "[4.0] ▼▼" button to transfer the preliminary design values to the main calculation.
Enter the number of worm threads. Commonly used values range from 1 to 4; in special cases, it can be up to 12. You can change the number of teeth using the "+" and "-" buttons.
The minimum number of gear teeth should be greater than 22 (indicated by red text). The minimum number of teeth can be influenced (see detailed design below).
The application factor includes the influence of drive irregularity and driven equipment irregularity.
Examples:
KA=1.00 … Electric motor / belt conveyor
KA=2.25 … Single-cylinder internal combustion engine / press, material crusher
Detailed analysis is in section [2.0].
The gearing quality factor determines the quality of the gearing, which includes the influence of material, lubrication, roughness, and precision.
For preliminary design, it ranges between:
c1=1.0 … Steel worm, cast iron gear, splash lubrication, mineral oil, higher roughness
c1=3.0 … Steel worm, bronze gear, spray lubrication, synthetic oil, low roughness, rigid design
Precise determination of materials, lubrication, and other parameters is in section [2.0].
With a selected number of worm threads z1 and a known module mx (DP), the worm diameter d1 is practically arbitrary, depending on the lead angle γ. Therefore, the diameter quotient is chosen q (d1 = q * mx).
Used values (+ ... recommended) are in the drop-down list. Regarding the bending stiffness of the worm, higher values are assigned to small .
For preliminary design, we recommend choosing q=10.
The lead angle is one of the key parameters of worm gearing, closely related to worm dimensions and transmission efficiency. Efficiency and diameter increase with an increasing lead angle. It should range between 6° to 40°.
If you need an exact lead angle, enter it and press the "◄" button.
Larger z1 increases the lead angle.
Larger q decreases the lead angle.
Detailed settings and calculations are provided in the detailed calculation below.
For the driving worm. This is the power required to obtain the specified output power [1.2] for the estimated efficiency.
Precise determination of efficiency is in the detailed calculation below.
Based on the parameters selected above, the module mx (DP) is proposed - green field.
By selecting from the list, you can choose a standardized or custom value for the preliminary design.
The diameter of the worm and gear is based on the module mx and the lead angle.
Detailed calculations can be found in sections [2.0-15.0].
Center distance and gear set weight can be useful optimization parameters.
Type the value you want to convert into the input box on the left. Select source units and target units on the right.
Ra and Rz roughness
The Ra and Rz roughness parameters are not directly transferable.
However, based on statistical evaluation, it can be said that with a very high probability the roughness Ra(Rz) derived from the roughness Rz(Ra) will lie within the range of values in parentheses. The biggest influence is the chosen machining technology.
The formula Rz=4*Ra is used to convert the entered value
The conversion formula for:
Rz => Ra
Ramin = 0.03 * Rz^1.3
Ramax = 0.24 * Rz^1.06
Ra => Rz
Rzmin = 3.8 * Ra^0.95
Rzmax = 14.5 * Ra^0.75
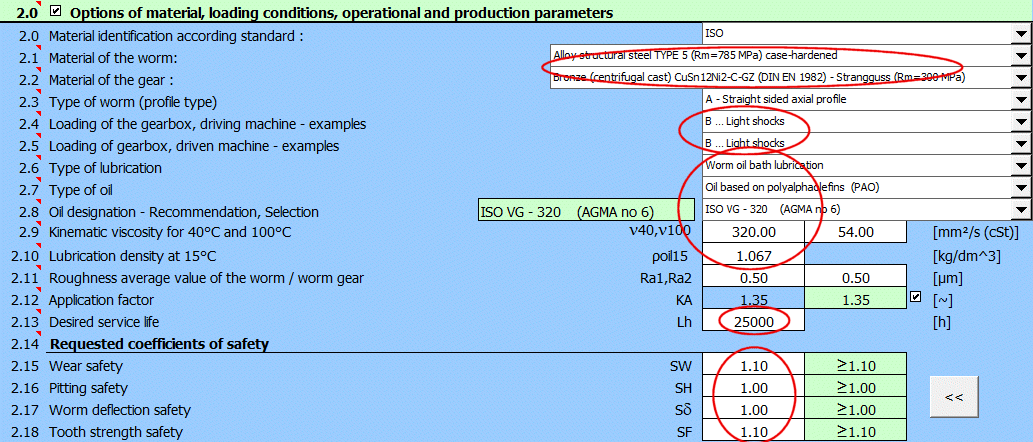
When designing a power transmission, enter additional operational and production input parameters in the article. Try to be as accurate as possible when choosing and entering these parameters as each one of them may have a dramatic effect on the properties of the gearing being designed.
Worm gearing strength is limited by various conditions, namely:
- Pitting formation on gear tooth sides
- Tooth side wear
- Fatigue break at tooth root
- Worm deflection
- Oil heating
These conditions must be reflected when choosing the worm and gear materials. Hardened and ground worm mating with tin or phosphorus bronze gear is mostly selected.
Material of worm gear
The basic material is bronze, less frequently being cast iron or brass. Plastic gears are used for lower powers (to absorb shocks and provide lower noise) and non-power gearing. Bronze gears are manufactured as composite for economical reasons (a bronze rim put on a steel or cast-iron wheel). Centrifugal casting is advisable.
The optimum options are tin bronze with high Sn content of 10-12% (excellent friction properties, high resistance to seizure and good running-in), but are too expensive. Their application can only be justified in loaded transmissions and with sliding speed exceeding 10 m/s. Even in these cases, however, there is an effort to replace them by Sn-Ni bronze and other alloys. Bronze with lower Sn content (5-6%) can be used for speed v = 4-10 m/s.
Less expensive bronze free from tin, e.g. aluminium or lead bronze, or brass are suitable for speeds v<4 m/s. They are relatively hard and strong, but are less resistant to seizure and are not so good for running-in. The mating worm, therefore, must have high surface hardness (HRC>45). In gearing with a greater worm gear, a combination of bronze worm and cast-iron gear can be used for economical reasons.
Grey cast iron mated with a steel worm can be used for low outputs, quiet load and low peripheral speed up to 2 m/s.
Material of worm
Carbon or alloyed steel which allows surface heat hardening (hardening to HRC 45-50, cementing and hardening to HRC 56-62, and nitriding) is used for worms. Tooth sides are ground and/or polished. When nitrided, the material need not be ground and polished only. Heat-treated or normalized steel worms are only used for lower outputs and lower peripheral speeds.
Customer’s own material values – If a material which is not specified in the table of materials should be used for gearing, a number of data should be entered about the material. Go to the sheet “Materials”. The first 5 lines in the materials table are reserved for defining the customer’s own materials. Enter the material name in the pertinent column (will be shown in the options menu) and fill in all parameters in the line (white boxes) gradually. After that, go to the “Calculations” sheet, select the newly defined material and continue the calculation.
Select the type of worm. For details on worm types see the theoretical section of the Help.
Profile type
A ... straight sided axial profile
N ... straight profiles in normal plane ofthread space width helix
I ... involute helicoid, straight generatrix in base tangent planes
K ... milled helicoid generated by biconical grinding wheel or milling cutter,
convex profiles in axial planes
C ... concave axial profile formed by machining With a convex circular profile
disc type cutter or grinding wheel
Setting of these coefficients substantially affects the calculation of safety coefficients. Therefore, try to enter as accurate a specification as possible when selecting the type of loading. Examples of driving machines:
A. Continuous: electric motor, steam turbine, gas turbine
B. With light shocks: hydraulic motor, steam turbine, gas turbine
C. With medium shocks: multi-cylinder internal combustion engine
D. With heavy shocks: single-cylinder internal combustion engine
Setting these parameters substantially affects the calculation of safety coefficients. Therefore, try to enter as accurate a specification as possible when selecting the type of loading. Examples of driven machines:
A. Continuous: generator, conveyor (belt, plate, worm), light lift, gearing of a machine tool traverse, fan, turbocharger, turbo compressor, mixer for materials with a constant density
B. With light shocks: generator, gear pump, rotary pump
C. With medium shocks: main drive of a machine tool, heavy lift, crane swivel, mine fan, mixer for materials with variable density, multi-cylinder piston pump, feed pump
D. With big shocks: press, shears, rubber calendar, rolling mill, vane excavator, heavy centrifuge, heavy feeding pump, drilling set, briquetting press, kneading machine
The types of gearing lubrication and gearbox cooling (or oil on pressure lubrication) depend on a number of conditions such as power transmitted, transmission ratio, speed, material, gearbox design, application, etc. The design can be based on worm peripheral speed, but all the conditions must be reflected in the final design.
Options of lubrication types depending on worm peripheral speed.
Oil bath lubrication: 0-4 [m/s] (0-13 [ft/s])
Oil-spray lubrication: 2-10 [m/s] (6-33 [ft/s])
Pressure circulation lubrication: 8 and more [m/s] (25 [ft/s])
Mineral oil can be used for less loaded gears, while synthetic oil is recommended for higher speeds, higher powers transmitted and higher efficiency requirements.
Some advantages of synthetic oils.
- Total losses reduced by 30% and more (smaller and more economical driving unit)
- Increased efficiency by 15% and more (smaller units)
- Oil working temperature reduced by up to 20ºC (68ºF)
- Oil change interval prolonged 3-5x (maintenance cost reduction)
- Reduced friction and gear wear
These advantages are opposed by higher price, possible problems with the plastic or rubber parts, and limited miscibility with mineral oils.
In the menu, oils are ordered by ISO (AGMA) viscosity. By selecting oil from the menu, selected oil parameters are transmitted to corresponding boxes (viscosity at 40 °C, viscosity at 100 °C, specific weight [kg/dm^3]). If oil parameters are known from the manufacturer’s material sheet, enter the parameters in the appropriate boxes [2.9,2.10].
Viscosity is selected primarily based on the circumferential speed of the worm v1 and the operating temperature. The lower the speed and the higher the load, the higher the viscosity required to create a load-bearing oil film.
v1 [m/s] ... ISO VG (at KA = 1.0)
< 0.5 .......... ISO VG 680
0.5 - 2.0 ..... ISO VG 460
2.0 - 5.0 ..... ISO VG 320
5.0 - 10.0 ... ISO VG 220
> 10.0 ...... .. ISO VG 150
Heavy duty operation and shocks (KA > 1.5): Increase the viscosity by one grade (e.g., from VG 320 to VG 460).
High ambient temperature (ambient temperature ϑ0>40∘C): Increase the viscosity by one grade.
| AGMA no of Gear Oil | ISO Viscosity Grade | |
| R & O | EP | |
| 1 | VG 46 | |
| 2 | 2 EP | VG 68 |
| 3 | 3 EP | VG 100 |
| 4 | 4 EP | VG 150 |
| 5 | 5 EP | VG 220 |
| 6 | 6 EP | VG 320 |
| 7 7comp | 7 EP | VG 460 |
| 8 8comp | 8 EP | VG 680 |
| 8A comp | VG 1000 | |
| 9 | 9 EP | VG 1500 |
Enter the value from the oil manufacturer’s material sheet.
Enter the value from the oil manufacturer’s material sheet.
Enter the roughness value. The following Ra values can be achieved for working methods:
- Milling: common Ra=1.6-6.3 mm (63-250 minch); under special conditions up to 0.2 mm (8 minch)
- Machining: common Ra=0.8-6.3 mm (32-250 minch); under special conditions up to 0.1 mm (4 minch)
- Grinding: common Ra=0.2-1.6 mm (8-63 minch); under special conditions up to 0.05 mm (2 minch)
Recommended Ra values:
Quality of worm flank machining ... Recommended Ra value1 [μm] ... Note
Polished ... 0.08 to 0.16 ... Top-quality gearboxes, high efficiency.
Fine ground ... 0.2 to 0.4 ... Standard high-quality industrial worms.
Ground ... 0.50 to 0.80 ... Standard commercial quality.
Turned/Milled ... >0.8 ... Not recommended for high-load gears.
The standard requires the Sq (Root Mean Square Roughness) value instead of the classic Ra value. Sq represents a shift from the traditional linear measurement of Ra roughness (2D) to a surface description (3D). Sq is statistically more sensitive to extreme peaks and valleys than Ra.
The calculation works with the roughness of both the worm (1) and the wheel (2).
In engineering practice, an approximate conversion factor of Sq = 1.2 * Ra is used for ground surfaces.
In the calculation according to DIN3996:2019, the specified Ra value multiplied by a factor of 1.2 will be used.
It is proposed based on load irregularity from the driven/driving machine [2.4,2.5]. The value is filled in automatically after activating the ticking box. The KA factor is used to multiply the torque value.
The parameter specifies the desired service life in hours. Orientation values in hours are given in the table.
Specification - Durability [h]
Household machines, seldom used devices - 2000
Electric hand tools, machines for short-term runs - 5000
Machines for 8-hour operation - 20000
Machines for 16-hour operation - 40000
Machines for continuous operation - 80000
Machines for continuous operation with log service life - 150000
Use lines [2.15-2.18] to enter the requested coefficients of safety. When calculating the table of proper solutions [4.1], only those solutions will be entered in the table which meet the required coefficients of safety. Recommended values are provided on the right of the entry field.
Parameters of the tooth profile can be changed within a wide range and are
often dependent on the manufacturing possibilities. The following values are
commonly used:
Addendum coefficient ham* = 1.0
Dedendum coefficient hfm* = 1.2 (in range 1.1 - 1.3)
The "◄◄" button sets the default values.
A recommended value is smx1* = 0.5
In general practice, this coefficient is very often less than 0,5 when there is
a wish to increase the worm wheel thread thickness to extend durability against
wear of worm wheel.
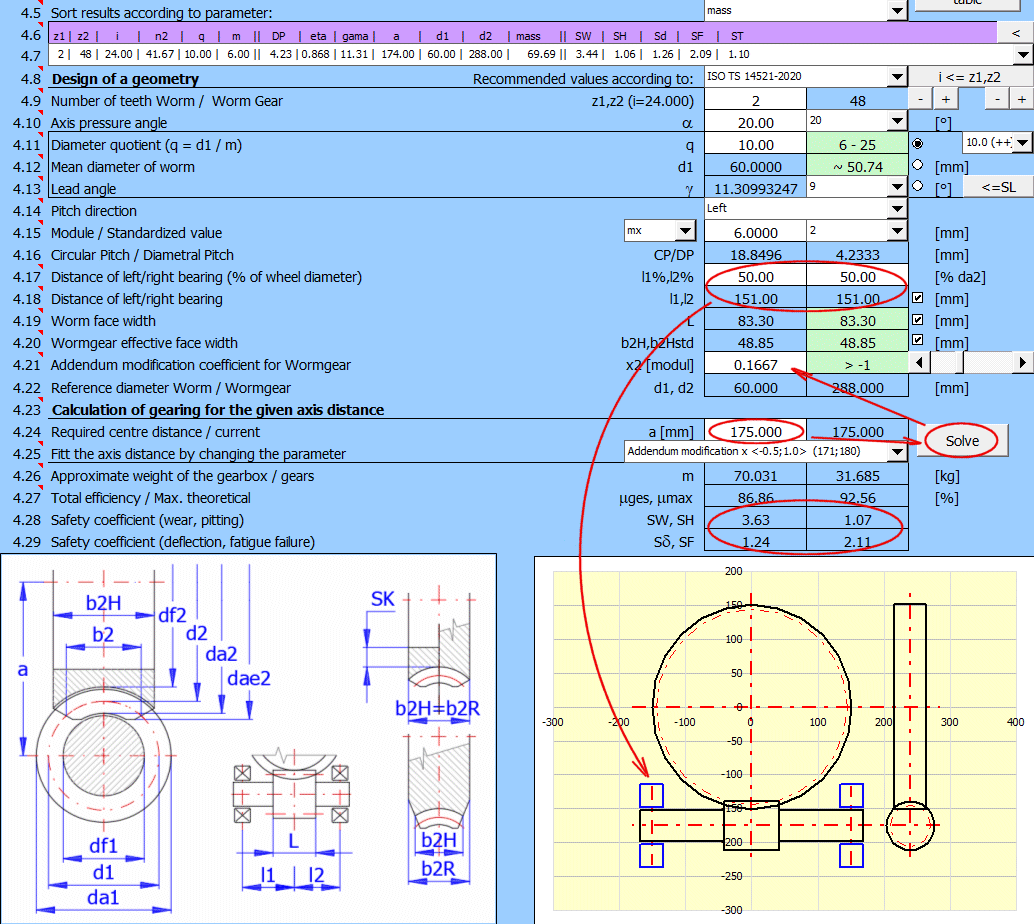
This is the central article of the whole calculation and the worm gearing geometry design. It is divided into three, closely interrelated parts.
- Proposal of a table of proper solutions [4.1-4.7]
- Direct design of geometry [4.8-4.22]
- Design (fine tuning) of precise centre-line distance [4.23-4.25]
The table of proper solutions is set up as follows: Numbers of worm teeth are entered in the calculation gradually (the range is set in [4.3]); worm diameter quotient q is gradually entered for each value (the range is set in [4.4]); and a minimum module value is searched for every such combination (and/or maximum value DP for inches) which meets the safety coefficients required (selected in [4.2]). After finding all proper solutions, the table is sorted by the parameter set in line [4.5] and the first solution in the table [4.7] is put into the calculation.
Start table calculation pressing the “Run the table” push-button. The calculation process is shown in the dialog.
In this line, tick the safety type which must be fulfilled to include the solution in the table of solutions. Set the coefficients in lines [2.14-2.17]. It is recommended to have the check of all coefficients activated.
In this line, enter the range of worm tooth number z1 for which the table should be solved. Usually z1=1~4 (higher number of worm teeth z1 for higher transmission ratio) is used.
The range of permissible values is z1=1~12, the first value being lower than or equal to the second one.
In this line, enter the range of diameter quotient q for which the table should be solved. Usually q=8-16 (higher value q for smaller module).
The range of permissible values is q=6~25, the first value being lower than or equal to the second one.
Choose by which column the table has to be sorted.
By selecting a solution from the table, the solution parameters are transferred into the calculation. The small push-button "<" on the right will transfer the values from the actual table line into the calculation.
The table includes the following parameters:
z1 - Number of teeth - Worm
z2 - Number of teeth - Worm Gear
i - Transmission ratio
n2 - Speed - Worm gear
q - Diameter quotient
m - Module
DP - Diametral pitch
eta - Total efficiency
gama - Lead angle
a - Center distance
d1 - Reference diameter
d2 - Reference diameter
mass - Approximate weight of the gearbox
SW - Safety coefficient (pitting)
SH - Safety coefficient (wear)
Sd - Safety coefficient (deflection)
SF - Safety coefficient (fatigue failure)
ST - Safety coefficient (temperature)
In this section, one can define directly all important worm gearing parameters which influence and define its geometry. The description and importance of individual parameters are specified for each of them.
Enter the number of teeth of worm. The value commonly used ranges from 1 to 4, in special cases up to 12. It is recommended to select the proper number of teeth from the table of solutions [4.6] on the basis of your optimization requirements (e.g. weight, efficiency, centre-line distance ...). In any case, it is advisable to consult manufacturing possibilities with the technologist.
The number of worm gear teeth is calculated on the basis of the required transmission ratio. The number of gear teeth must acquire a certain minimum value; otherwise, tooth undercut would occur. If this is the case, the minimum value is shown in brackets and the box text is shown in red.
Axial pressure angle is entered for the ZA type worm, while normal pressure angle is entered for other types (ZN,ZI,ZK,ZH). Pressure angle is selected from 15º to 30º.
The value of 20º is commonly used. Pressure angle can be selected in dependence on the requirements for the equipment being designed. Greater pressure angle results in higher safety against fatigue break (SF) and lower danger of gear tooth undercut. On the other hand, greater pressure angle reduces the number of engaged teeth, increases bearing load and the worm deflection load (greater worm deflection). Pressure angle can also be selected in dependence on lead angle [4.13], the greater being the pressure angle, the greater lead angle is chosen.
Minimum number of gear teeth in dependence on pressure angle at zero gearing correction.
| Pressure angle [º] | Min. z2/NG |
| 14.5 | 40 |
| 17.5 | 27 |
| 20 | 21 |
| 22.5 | 17 |
| 25 | 14 |
| 27.5 | 12 |
| 30 | 10 |
q = d1 / m
Worm diameter d1 is virtually arbitrary with the chosen number of worm teeth z1 and the known module value (mx or mn), unless a certain value of lead angle γ is required. In the effort towards the least possible number of screw cutters for manufacturing work gears, the manufacturers recommend choosing d1 = q • m, where q is the coefficient depending on the size of standardized module m. In consideration of worm rigidity in bending, greater values q are assigned to lower values m.
| m | 2 | 2.5 | 3 | 4 | 5 | 6 | 8 | 10 | 12 | 16 | 20 | 25 |
| q | 16 | 12 | 12 | 9 | 9 | 9 | 8 | 8 | 8 | 8 | 8 | 6 |
| 14 | 10 | 10 | 10 | 9 | 10 | 10 | ||||||
| 12 | 12 | 12 | 10 | |||||||||
| 14 | 14 | 14 | 12 |
d1 = q • m
If you require entering a precise worm diameter value, activate the entry field by ticking the selection push-button. The recommended approximate value d1 in dependence on the module and on the number of worm teeth is given on the right of the entry field.
Lead angle is one of the key parameters of worm gearing closely related to worm dimensions and transmission efficiency. Efficiency grows with increasing lead angle (for detailed information see the efficiency section in help).
The important lead angle is at the self-locking limit (static). This angle is filled in after pressing the "<=SL" push-button on the right (for detailed information see the efficiency section in help).
Recommended value:
6º-40º in worms manufactured from one piece
to 17º in worms put on a shaft
Select pitch direction. It only has an effect on force orientation and sense of rotation. Unless the drive kinematics require otherwise, the worm has the right sense of rotation.
Module (DP) is the key parameter which affects the gearing size and, thereby, pertinent safety coefficients. The following entries are required in dependence on the selected calculation units [1.1]:
SI units (N, mm, kW…)
Gearing module is required, axial mx for ZA worm type and normal mn for other types (ZN,ZI,ZK,ZH).
Imperial units (lbf, in, HP…)
The DP (Diametral Pitch) value is required. Axial DPx for worm gear type ZA and
normal DPn for other types (ZN, ZI, ZK, ZH).
The table (recommended) value can be selected from the options menu on the
right.
Module: (0.1; 0.12; 0.15; 0.2; 0.25; 0.3; 0.4; 0.5; 0.6; 0.8; 1; 1.25;
1.5; 2; 2.5; 3; 4; 5; 6; 8; 10; 12; 16; 20; 25; 32; 40; 50; 60; 80; 100; 120;
160; 200; 320; 400)
Diametral pitch: (250; 200; 160; 128; 96; 80; 64; 48; 40; 32; 24; 20; 16;
12; 10; 8; 7; 5; 4; 3; 2.5; 2; 1.5; 1.25; 1; 0.8; 0.6; 0.5; 0.4; 0.3; 0.25; 0.2;
0.16; 0.125; 0.08; 0.06)
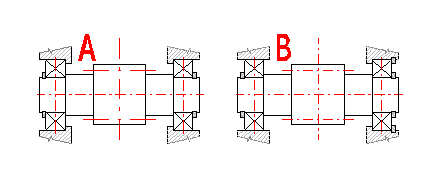
Bearing distance from worm centre (see the Figure) has a direct impact on worm deflection and thus on worm deflection safety. In the line [4.17] enter the distance of the left and right bearing from the gear centre as percentage of worm gear outer diameter. This method of selection is used automatically when calculating the table of proper solutions [4.6]. If you require entering a precise value, clear the ticking box on the line [4.18] and enter the precise value.
Worm face width is proposed automatically on the basis of the module and the number of teeth. If you want to enter your own value, clear the ticking box on the right.
Worm face width is proposed automatically on the basis of worm diameter. If you want to enter your own value, clear the ticking box on the right.
In principle, the worm is manufactured without any addendum modification. Worm gear only is modified, the main reason for using addendum modification (manufacturing tool shifting) being to achieve required (standardized) centre-line distance. The use of addendum modification to eliminate tooth root undercut or to improve tooth bending strength is less frequent.
The minimum value of the addendum modification coefficient to prevent tooth root undercut is given on the right of the input box. If the actual value is lower, the value is shown in red. The minimum addendum modification coefficient depends on the number of gear teeth [4.9] and on the pressure angle [4.10].
A worm gear design with given axis distance is the most frequent task. The following procedure is recommended for designing:
- Calculate a table of proper solutions [4.1]
- Sort the results by axis distance [4.5]
- Select such a solution where the axis distance is close to your requirement and also meets other requirements [4.7]
- Enter the axis distance required [4.24]
- Select the method for reaching required axis distance [4.25]
- Press the "Solve" push-button
Axis distance can be influenced by a number of parameters. The following can be used in this calculation:
- Change of module (DP for inch units)
- Change in addendum modification x
- Change in diameter quotient q
For every method, the range of possible parameter change is specified in brackets "<>" and the range of possible change in axis distance is specified in parentheses "( )".
The first box shows the weight of the complete gearbox (the sum of weights of gear wheels, shafts and gearbox body). The second box provides the weight of the worm and gears including shafts. Cast iron is considered as material for gearbox weight calculation.
The first box shows the total efficiency of the actually designed gearing, while the right one shows the maximum theoretically possible efficiency for the actual conditions (lubrication, materials, bearings, etc.).
Total efficiency is affected most by lead angle [4.13], when higher lead angle results in higher efficiency.
This article provides a well-arranged list of all basic dimensional parameters of gearing. Formulas used, figures and other information are specified in the theoretical section of the Help.
It is the greatest diameter of worm gear, while the approximate recommended value as per DIN 3975 is: de2=da2+mx, which has been pre-set. The minimum and maximum values are provided in the green box on the right.
If a specific value has to be entered, clear the ticking box in this line.
This article provides calculation of gearing efficiency and all other relating parameters. Formulas used, figures and other information are specified in the theoretical section of the Help.
Bearing losses are one of the parameters having an impact on efficiency. This value depends on bearing type and supporting method. Identify the worm shaft supporting method in the options menu.
A...Shaft supported on both sides in fixed bearings, either of the bearings retaining one of the axial force directions
B...Bearing is floating on one shaft end, the other retaining axial forces in both directions
C...Friction bearings (friction coefficient estimated for less loaded bearings)
Depending on the design, you can select the number of worm shaft seals used from the drop-down list.
Overall transmission efficiency. On line [1.3], select the transmission type:
A. Driving worm
B. Driving worm gear
This article shows wear safety calculation. More detailed information is available in the theoretical section of the Help.
If you select the option δWlimn - c) Wear leads to an allowable (agreed) weight loss of the worm gear - in the selection on the following line, you can enter the weight loss as a % of the gearing weight on this line.
Next to the input cell is the calculated weight of the material corresponding to the percentage requirement. At the same time, on the following line, you can monitor the tooth wear for the given weight loss .
If you then measure the weight of the bronze dust (e.g., during oil change and analysis), you can determine the actual tooth wear.
Recommended values: Based on experience, the allowable weight loss is chosen between 10% and 20% of the gearing weight (the part where the teeth are).
The allowable worm gear wear depends primarily on the device in which the worm gear is used. It can be determined, for example, by the maximum backlash in the gearing. In any case, however, a limit wear value is reached at the edge of the tooth pointing (a).
If specific conditions are not agreed upon, (d) - allowable backlash in the gearing - is often used.
Wear is directly dependent on the required service life Lh.
In the selection box, it is possible to choose from the following conditions:
- Entering a custom δWlim value.
- a) Wear leads to pointing of the gear tooth tip, and further wear leads to a reduction in tooth height.
- b) Wear leads to tooth weakening and eventually to its breakage (SF<1.1).
- c) Wear leads to an allowable (agreed) weight loss of the worm gear (mass wear). This value can be used, for example, if you monitor the weight of bronze dust during an oil change. The loss is determined on the previous line.
- d) Wear leads to the commonly used backlash in the gearing δWlim=0.3 • mx • cos(gm), roughly 30% of the maximum value.
It can be controlled (increased) by choosing lower required service time [2.13], oil of higher grade, higher viscosity [2.7,2.8] and, of course, selecting geometrical parameters.
The required safety can be achieved by changing the service life [2.13] to the value.
Press the ">> Lh" button to transfer the value to the input cell [2.13].
This article provides the pitting safety calculation. More detailed information is available in the theoretical section of Help.
The required safety can be achieved by changing the service life [2.13] to the value.
Press the ">> Lh" button to transfer the value to the input cell [2.13].
The article provides the calculation of worm deflection and reactions in supports (bearing loading). More detailed information is available in the theoretical section of Help.
The calculation of deflection according to DIN/ISO uses a simplified procedure. If the safety is around 1.0, we recommend using a more precise separate calculation.
This article provides the calculation of root-strength of teeth. More detailed information is available in the theoretical section of Help
The smaller value from the following is used to calculate Δs:
- Extreme tooth flank wear value - tooth sharpness [7.20-a)].
- Actual tooth flank wear value [7.18].
After unchecking the button, you can enter your own value for the thickness of the SK wheel gear rim. The default value (SK=2 * mx) is set so that the gear rim thickness coefficient YK=1.0
Higher life factor is conditioned by higher plastic deformations only acceptable for gearing with lower accuracy grade. If higher reliability is required, it is advisable to set life factor to YNL=1.0. If the ticking box is crossed, the value based on material used, number of load cycles and accuracy grade selected is filled in automatically.
Standard:
Shear endurance limit ΤFlimT.
Reduced:
Reduced shear endurance limit, ΤFlimT. When accuracy grade deterioration is not accepted, reduced values should be used, since bronze materials show small plastic deformations.
This paragraph provides the tools for calculation and check of gearbox energy balance. Since worm gear efficiency is substantially lower than that of spur or bevel gearing, considerably more heat which has to be removed is generated in the gearing. Therefore, thermal safety is of great importance for correct design, which would ensure gearbox function within the permissible oil temperature range.
The first section calculates temperature safety, while the second section calculates wheel bulk temperature. More detailed information is available in the theoretical section of Help.
The types of gearing lubrication and gearbox cooling (or oil on pressure lubrication) depend on a number of conditions such as power transmitted, transmission ratio, speed, material, gearbox design, application, etc. The design can be based on worm peripheral speed, but all the conditions must be reflected in the final design.
Options of lubrication types depending on worm peripheral speed.
Oil bath lubrication: 0-4 [m/s] (0-13 [ft/s])
Oil-spray lubrication: 2-10 [m/s] (6-33 [ft/s])
Pressure circulation lubrication: 8 and more [m/s] (25 [ft/s])
Enter ambient air temperature, usually 20°C [68°F].
The usual maximum temperatures are for:
- Mineral oil 90°C [194°F]
- Polyalphaolefin-based synthetic oil (SHC) (PAO) 100°C [212°F]
- Polyglycol-based synthetic oil (PEG) 100-120°C [212-248°F]
Temperature appears automatically according to the oil type selected. If you want to enter your specific value, clear the ticking box.
Select the method used to determine the oil sump temperature.
Method C: Simplified - approximate method according to DIN/ISO, designed
for very well-finned gearboxes made of cast iron with a center distance of
63-400 [mm], worm speeds of 60-3000 [/min], and a gear ratio of 10-40.
For the oil sump temperature, a deviation of +- 10°K from the actual value must
be expected.
Method B: Thermal analysis. It allows solutions for different housing
materials, various types of finning, and it is possible to include external oil
cooling.
Select whether a fan is attached to the worm shaft or the gearbox has no fan.
According to DIN/ISO, it is possible to use an approximate formula to calculate the temperature of a well-ribbed gearbox for cast-iron gears with centre-line distance 63-400 [mm], worm speed 60-3000 [rpm] and transmission ratio 10-40. A deviation of ± 10°K from the actual value should be taken into account.
The approximate formula result shows gearbox temperature [11.10] and thermal safety [11.12], which should be higher than 1.1.
The value indicates the thermal (loss) power of the gearbox transferred to
the ambient environment.
The value should be higher than 1.1
This section enables making a simple thermal analysis of a gearbox. Most input parameters are estimated on the basis of size, power transmitted, design type and others. But more precise values can also be used, obtained from measurement on a similar gearbox or from the professional literature, for instance.
Clear the ticking box in the pertinent line to enter a specific value of a required parameter.
Select the type of gearbox surface (design) in the options menu. The parameter has an impact on surface estimate [11.16] and heat transfer coefficient [11.17].
It is proposed on the basis of oil used so as to achieve thermal safety coefficient 1.1.
Surface area is achieved by an approximate calculation based on gearing dimensions. It is advisable to use a suitable output from the CAD 3D model for precise calculation (check).
Heat transfer (transmission, radiation) coefficient depends on the gearbox operation environment (ventilation, room size), gearbox size, ribbing, number of worm speed, temperature, etc. The use of a fan can triple the coefficient. Any precise calculation of the coefficient is therefore difficult and requires a thorough analysis. Values from 5 [W/m2*K] to 50 [W/m2*K] were measured in practice. If the ticking box is crossed, an approximate value estimated based on gearbox speed, size and design is added automatically.
Recommended values:
Basic values for box without fan:
- Small unventilated rooms ...8-12 [W/m2*K]
- Well ventilated rooms ...14-20 [W/m2*K]
Fan effect: The use of a fan may increase the coefficient by up to 100%
Size effect: Small gearboxes may have the coefficient up to 50% higher than big ones
Temperature effect: The coefficient may increase by up to 15% with the difference of ambient temperature and oil temperature increasing
Speed effect: The coefficient increases with worm speed increasing
In gearboxes where the loss heat is higher (higher power, lower efficiency), natural cooling is often insufficient and additional oil cooling must be used in the form of an external oil cooler or a cooling worm in the gearbox.
This line shows the loss power necessary to achieve the required temperature [11.15]. If additional cooling is not required, the value is zero.
If oil-spray lubrication is selected [2.6, 11.1], the volume of oil supplied by the pump can be proposed in this section.
The basic calculation of temperature rise inspection for splash lubrication
according to DIN/ISO does not include the effect of oil/housing cooling that
occurs by other means (for example, natural radiation).
This is a very conservative approach, which may result in unrealistic values.
Therefore, this calculation is extended with the possibility to include this
effect as well. You can enter your own value for additional cooling or select a
proportional value of the housing power loss (100-0%) from the previous
paragraph.
If a value of 0 is selected, the calculation corresponds exactly to the DIN/ISO
calculation.
Specify in this line whether or not an oil cooler is used. Oil cooler application has an effect on the temperature difference of the lubrication oil.
It is the difference of temperatures between oil drawn by the pump and sprayed oil.
The usual values are as follows:
- Oil spray without oil cooler – 2-5 °C
- Oil spray with oil cooler – 10-20°C
The value for lubrication oil is pre-set at 1900 Ws/Kg/°K [0.454 BTU/lb/°F]
Such oil spray volume which will guarantee gear cooling to the required temperature ϑSlim/1.1 [11.3] is proposed on the basis of entered parameters [11.23-11.26] and PV [11.5].
The wheel bulk temperature is required for determination of the wear intensity.
This article provides a calculation of dimensions as per AGMA 6022-D19. Since the design of worm gearing allows considerable liberty, some dimensional parameters to DIN/ISO and to AGMA may differ.
The worm lead is the amount of the axial advance of any point on the worm in one revolution of the worm.
The allowance for backlash in the axial plane of the worm.
ht … Full depth of the worm thread
tnc … Normal chordal thread thickness of the worm
tnc = (px/2 - B) * cos(Lambdam)
B … is the allowance for backlash in the axial plane of the worm, in (mm).
This standard provides methods for rating and design of enclosed cylindrical wormgear speed reducers and gearmotors with speeds not exceeding 3600 rpm and sliding velocity not exceeding 30 m/s. This standard applies only to cylindrical worm gearing where the worm is made of surface-hardened steel and the worm gears are made of bronze.
Details on the validity of the calculation are provided in the standard.
The ANSI/AGMA standard contains detailed tables for selecting the "Service factor" value. The specified input power must be multiplied by this factor, which then must be compared with the allowable input power value according to this calculation,PiB, Piw.
The "Service factor" value usually ranges from 1.0 to 2.25.
AGMA "Service factor" values correspond to the application factor "" used in the DIN/ISO standard. Therefore, it is possible to use the coefficient from section [2.0]. The and values are divided by this coefficient, so they can be directly compared with the specified input power [1.4].
The oil type selection is in section [2.0].
Recommended value (depending on the selected material):
Bending strength related ratings are based on a fatigue failure mode where the
gear tooth fractures near the fillet. Ratings are based on experience gathered
by the industry and conveyed by empirical formulas and factors. The equations
are based on a nominal service life of 25 000 hours.
Forces are generated in loaded gearing and transmitted to the machine structure. The knowledge of these forces is quite crucial for proper dimensioning. Force orientation is shown on the figure and force magnitudes are specified in this article [14.1-14.10].
This paragraph lists material characteristics of the pinion and gear materials.
This article provides the calculation of parameters necessary to achieve the required precise centre-line distance. Enter the number of worm teeth and the number of worm gear teeth in the line [16.1]. Enter the required centre-line distance in the line [16.2] and press the "Run the calculation" push-button. The calculation may take several seconds and the table of proper solutions in the line [16.4] is filled in after it. After selecting a suitable variant from the table, the parameters (z1,z2,modul,q,x) are transferred to the main calculation.
This paragraph gives designs of shaft diameters (steel) which correspond to the desired loading (transferred power, speed). These values are orientation values only; it is advisable to use a more exact calculation for the final design.
Auxiliary calculations are available in this paragraph. When entering values, use the same units as in the main calculation. To transfer the entered and calculated values to the main calculation, press the button "OK".
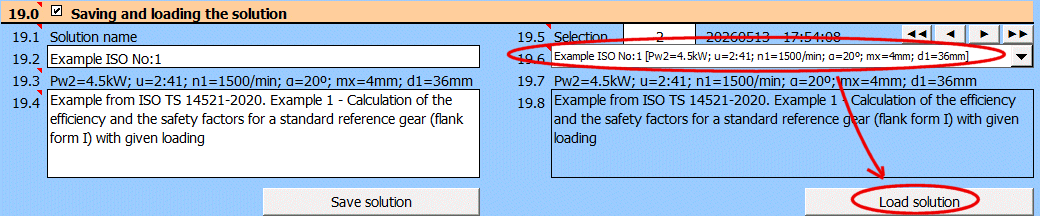
Solving the worm gear solution requires entering and selecting dozens of parameters. Therefore, it is possible to name and comment on the solution and save it to a list for future use.
Save the current state of all parameters - the solution - with the "Save solution" button.
Solutions are saved on the "Solutions" sheet. One row contains one saved solution.
When the "Save solution" button is pressed, the list is searched, and if a record with the same name exists, it is overwritten with the current state. If the name does not exist in the solution list, the last filled row on the "Solutions" sheet is found, and the current solution is written to the next row.
The "Solutions" sheet is freely accessible and can be edited normally with Excel tools (e.g., deleting unnecessary solutions - rows).
Retrieving a single value from a saved solution.
If you need to retrieve a specific value and use it in your own formula, the GetSolProp function is available to do so.
Syntax:
GetSolProp(ID;value_name)
ID ... The row number on the "Solutions" sheet that contains the saved solution
value_name ... The name of the value you want to retrieve.
Enter the name of the solution.
The solution will be saved under this name in the list of saved solutions.
Automatically generated text that is added to the description and contains basic information, including: Pw2, u, n1, α, d1
Enter a description. This will allow for better orientation when subsequently viewing already saved solutions.
Use the buttons on the right to navigate through the list of saved solutions.
The solution save date is in the format "yyyymmdd - hh:mm:ss".
The dropdown list contains worm gear solutions that are saved on the
"Solutions" sheet.
After selecting a solution from the dropdown list below, press the "Load
solution" button.
1. In the "Output of a 2D drawing into" list, choose the target CAD system (target application) to which the picture should be generated, or a "DXF File" to convert the drawing into a .DXF file.
2. In the "Scale of 2D drawing" list, set up the drawing scale. The drawing is always created in the scale 1:1. The scale allows you to set only certain parameters of the drawing, such as the size of the text or overlapping of the axes.
3. If necessary, set up another control elements as well. Most calculations also include other setting options, which depend on the calculation and type of the plotted object. Explanation of these supplementary options can be found in the help for the respective calculation.
4. Start plotting using the button with the icon of the desired drawing.
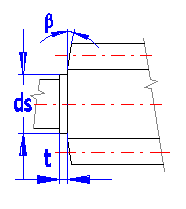
Enter the values according to the Figure. If the ticking box is crossed, the values are entered automatically.
Enter the angle of worm shrink.
Locate the text description in the 2D drawing by pressing the button “Draw”. The text can be edited after the tick off box has been activated.
If it is supported by the respective module for entering models into a 3D CAD system, the contents of individual rows is entered into user attributes of the model and these can be used when generating a BOM.
(Details can be found in Help for connection to the respective 3D CAD system.)
A series of calculations (gearing, springs, etc.) enables entering of the respective table with text information on the calculated object into the drawing. The table can be selected from the respective list (in case the calculation enables more types to be entered). Drawing of the table can be activated by pressing the button “Draw a table”.
Defining a 3D model is not a trivial matter, and defining a parametric model for any CAD system is demanding. Therefore, we have prepared the option to generate data for the creation of an accurate non-parametric model for virtually any 3D CAD system. You can use these models, for example, for manufacturing (3D printing, multi-axis machining...).
The creation of accurate models thus consists of several simple operations.
Worm:
- Creation of a helix from one worm tooth.
- Generation of a circular pattern of helices according to the number of teeth of the worm.
Worm wheel:
- Creation of a wheel without teeth (simple rotation of the wheel profile).
- Loading of tooth gap profiles, their connection to each other and subtraction from the created wheel.
- Generation of a circular pattern of gaps, thereby creating an accurate gear.
Note:
Settings and procedures for selected CAD systems are provided in the help.
The choice is identical to and linked with the selection in paragraph [4.0]. Unless required by the drive kinematics, the worm usually has a right-hand lead. The choice affects the generation of the tooth gap profiles and, naturally, it is necessary to select the corresponding direction of rotation during worm generation as well.
If you check this box, the profiles created as DXF will contain only the outline (worm tooth, wheel profile). For most CAD systems, it is not necessary to enable this option.
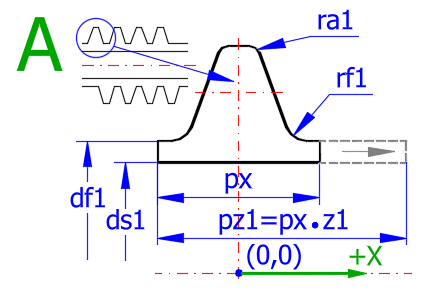
This command creates a DXF file containing the exact worm tooth profile (see Figure A). Set the exact profile parameters below.
Instructions for worm generation:
- Save the DXF file.
- Insert the saved file as a "SKETCH" into the chosen plane (preferably XY).
- Create a helix. (Different CAD systems have different procedures for creating a helix).
- In any case, it is always necessary to use the correct lead, which is the value pz1 !!!
- Create a circular pattern of helices according to the number of teeth z1.
Selected values from the main calculation that you will need during the creation of the 3D model (and for its verification).
CAD systems usually reject a profile that intersects the helix axis when creating a helix. Therefore, an internal worm diameter is introduced (corresponding to the estimated shaft diameter).
After unselecting the button on the right, you can enter your own value, including ra1 and rf1.
The preset value ra1, rf1 indicates an estimate of the manufacturing fillet (different methods of worm production).
To enter custom values, unselect the button on the line above.
This command creates a DXF file containing the exact profile of the gear (see Figure B). Set the exact profile parameters below.
Instructions for worm wheel profile generation:
- Save the DXF file.
- Insert the saved file as a "SKETCH" into the YZ plane !!!
- Create the worm wheel (without teeth) by revolving the profile around the Z axis.
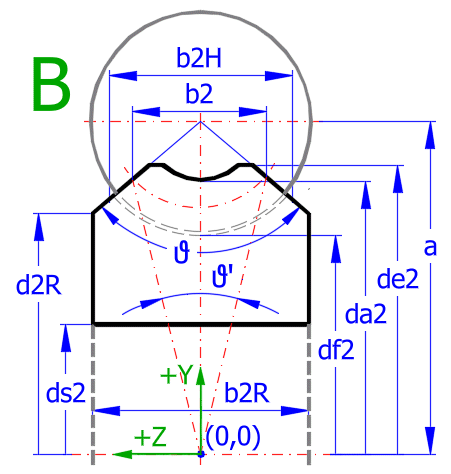
The setting defines how the section will be rotated in the coordinate system.
Recommended values for selected CAD systems for the YZ plane:
Inventor - 270
Solidworks - 0
Solidedge - 270
Creo - 270
Selected values from the main calculation that you will need during the creation of the 3D model (and for its verification).
The preset value corresponds to the DIN/ISO/ANSI recommendations from [4.0].
After unselecting the button on the right, enter your own value.
You can check the change in the image on the right.
Min. value b2R=1*mx
Max. value b2R=2*da1
After unselecting the button, you can enter your own value.
The recommended value is calculated based on the values b2R and d2R.
The Min./Max. value is on the line above.
After unselecting the button, you can enter your own value.
The recommended value is calculated based on the values b2R and d2R.
The Min./Max. value is on the line above.
The preset value corresponds to the selection of the rim thickness from the strength calculation [10.0].
After unselecting the button on the right, you can enter your own value.
Note:
The Max. value ds2 is limited by the value df2-2*mx.
An angle value greater than approx. 150º usually makes no sense, except for specialized design solutions (indicated by a red digit).
For high values of the angle ϑ, the teeth at the edge of the wheel are thin and thus cannot fulfill their role in case of increased wear.
In this case, check your design and, if necessary, adjust b2R, de2, and d2R.
The value indicates the transmission between the worm and the wheel. Worm displacement per one revolution of the wheel (iTR = d2 * Pi).
Set the tooth gap parameters here (see Figure C).
If you do not have special requirements, use the recommended settings.
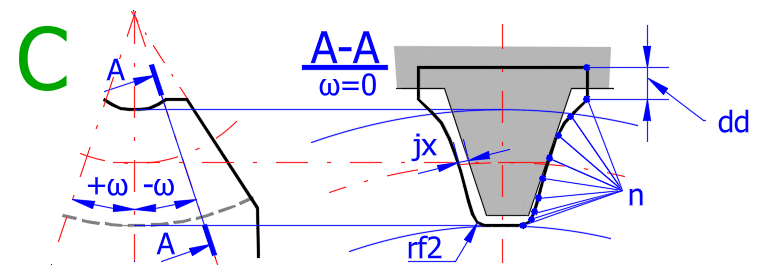
It is the smallest distance between the non-working tooth flanks in the axial direction. Backlash is necessary to create a continuous lubricant film on the tooth flanks and to compensate for manufacturing inaccuracies, deformations, and thermal expansions of the mechanism components.
After unselecting the button on the right, enter your own value.
Recommended values:
In practice, these are chosen empirically, and it is possible to follow the recommended value on the previous line. For the calculation of recommended values, recommendations based on the center distance and the transmitted power are used.
Center distance:
jxmin=10*(a)^0.5*0.001 [mm]
jxmax=40*(a)^0.5*0.001 [mm]
Transmitted power:
Precision gears ..... 0.01-0.02*mx for Pw<0.1
Standard gears ..... 0.03-0.05*mx for 0.1
Heavy drives ..... 0.08-0.12*mx for Pw>100
For standard gearing, 20 points are usually sufficient (Fig. C). The wider the gearing and the larger the throat angle ϑ, the better it is to use a higher number of points with regard to the accuracy of the generated curve. If you do not have special requirements, use the recommended value.
Range n [10 ... 100]
If you do not have special requirements for the tooth root fillet value, use the recommended value (half of ra1).
By entering the value rf2, you are essentially defining the tip radius of the cutting tool tooth. In any case, the value should be smaller than the value ra1.
To improve the shape of the tooth gap curve ("spline") at its tip, 2 extension points are defined. Usually, the default value of 0.2 is sufficient.
The axial backlash jx can be achieved in 2 ways.
- by reducing the tooth thickness (increasing the tooth gap). This method is used in this calculation for generating the tooth gap.
- by increasing the center distance between the wheel and the worm. This is only an informative value. It can be useful when testing 3D models.
During the mutual movement of the worm and the wheel, a combination of translational and rotational motion occurs in 3D space. It is therefore not possible to use a simple 2D solution such as rolling a rack on a gear, but it is necessary to solve the motion in 3D.
By clicking the "Generate 1" button, you generate one curve for the current angle ω.
By clicking the "All" button, you generate a sequence of 5,7,9,11 curves at once for the changing angle ω.
Set how many sections will be generated at once (using the "All" button above).
The recommended value is marked with asterisks and depends on the angle ϑ (Fig. B).
Various CAD systems support importing points that form the curves in various formats. The following formats are available:
XLSX – the field of the points comprises an *.xlsx or *.xls file format file, which in one line contains the coordinates of one point, whereas the coordinates x,y, and z are in columns A,B, and C (Inventor and others)
TXT – the field of points comprises a text file, which in each line contains the coordinates x,y, and z separated by a space
CSV – the field of points comprises a text file, which in each line contains the coordinates x,y, and z in brackets and separated by a comma
DXF – the points field comprises the sequence of related line segments (beginning, end) in DXF format
SLDCRV – format for SOLIDWORKS (text format, dot decimal separator, numbers separated by a space)
IBL – format for Creo (text format, dot decimal separator, numbers separated by a space, text definition of the curves)
It is possible to set the value at 01–10. When saving the files necessary for the creation of the 3D model, a name is offered by default, for instance, '01_Spline_z1_2_z2_41.....'. This is suitable, for instance, for the creation of various versions of the model.Caution:
The program overwrites any existing files with identical names without warning.
Enter the angle of the generated section ω (Fig. C). Its orientation is shown by the blue line in Figure B.
This angle will be used for generating an individual section (the "Generate 1" button).
After pressing the "R" button, the image of the section on the right is updated according to the specified ω.
If you generate 1 section using the "Generate 1" button, the value Δω is added to the angle ω. This allows you to easily create any number of sections.
When creating the tooth gap curve, the movement of the tool (worm) along the wheel is simulated. For high angles ω (75-90º), the curve can be very elongated. Some CAD systems may refuse to join these elongated curves using the "LOFT" function (which joins individual curves into a single object).
Therefore, it is possible to set a maximum value for the tool movement along the wheel (thereby limiting the tooth gap width at the edges where it overlaps during rotation).
In the vast majority of cases, the recommended value is sufficient.
The change in settings can be observed for high angles ω in the image on the right.
Min/Max value [4 ... 80].
This coefficient sets the influence of the lead angle gamma during the section rotation when simulating tool movement. Use the preset value.
If interference occurs between the worm and the wheel in extreme gearing types (large lead, large wheel width, large angle ϑ > 120º, etc.), try slightly increasing this value after unselecting the button on the right.
A higher value increases the tooth gap width at the wheel edges.
Min/Max value [0 ... 2]
The procedure for creating a worm and wheel model is similar across various CAD systems. Therefore, we provide a general procedure here, which you should adapt to your needs.
Worm model A1, A2
- Save the DXF file containing the tooth profile.
- Insert the saved file as a "SKETCH" into the chosen plane (preferably XY).
- A1 ... Create a helix. (Different CAD systems have different procedures for creating a helix).
- In any case, it is always necessary to use the correct lead, which is the value pz1 !!! and the choice of hand of rotation (Left/Right).
- A2 ... Create a circular pattern of helices according to the number of teeth z1.
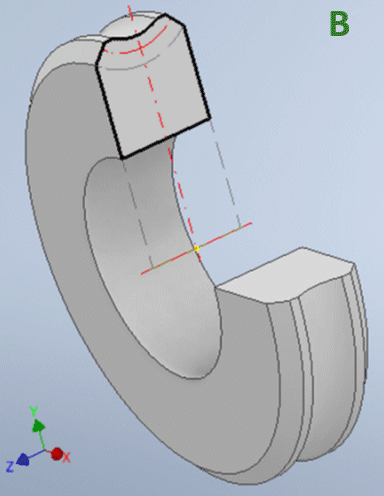
Wheel model B
- Save the DXF file containing the gear profile.
- Insert the saved file as a "SKETCH" into the YZ plane !!! (the wheel axis must be in the Z axis).
- Create the worm wheel (without teeth) by revolving the profile around the Z axis.
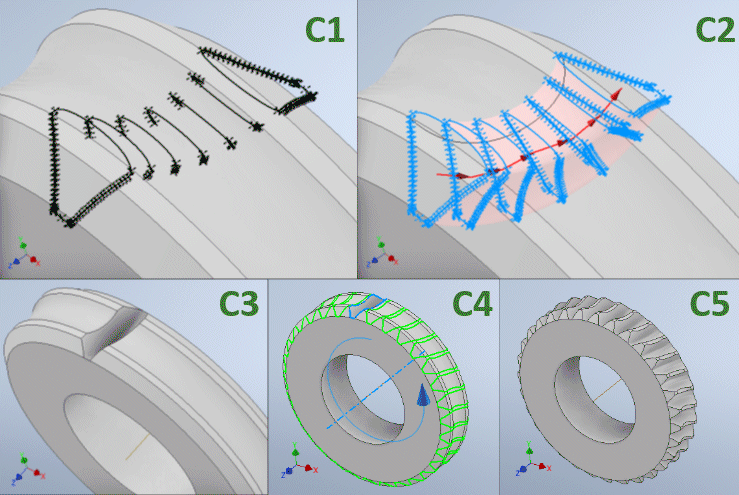
Tooth gap model C1...C5
- Create curve files containing the tooth gaps. Select the file type according to your CAD system.
- C1 ... Load/insert these curves into the CAD system.
- C2 ... Use the "LOFT" function to join the curves and subtract this shape from the wheel model (B).
- C3 ... This creates the tooth gap.
- C4 ... Create a circular pattern corresponding to the number of teeth z2.
- C5 ... The exact gear model is created.
Usually, you will insert the worm and wheel models into your own assembly. However, it is advisable to create a separate sub-assembly with the worm and wheel, where you create constraints directly to the sub-assembly coordinate system. This allows for easy inspection of the gearing.
Create an empty assembly.
1 ... Insert the wheel model and constrain the wheel axis to the Z-axis of the assembly.
Constrain the center plane of the wheel to the XY plane of the assembly.
2 ... Create a reference plane parallel to the XZ plane of the assembly at distance a (center distance).
3 ... Create a reference axis as the intersection of two planes.
4 ... Insert the worm into the assembly and constrain the worm axis to the reference axis.
5 ... Align the position of the teeth and check for any interferences.

The wheel profile that will be generated into the DXF file is shown in black.
The blue line segment shows the current angle ω and thus the plane in which the tooth gap will be created (Fig. C).
The image contains three curves:
Blue … The curve displays the tool outline that creates the tooth gap.
Green … The tooth gap for angle ω = 0.
Black … The tooth gap for the specified angle ω. The number of points corresponds to the entered value n.

Below are examples of tasks that can help you navigate the calculation, create models, and solve standard worm gear design questions.
Often you need an indicative solution for a worm gear. The preliminary design gives you basic information about the gearing size in relation to the transmitted power, speed, and gearing quality. Thus, it is not necessary to go through and set dozens of parameters for an exact solution. The preliminary design is in paragraph [1.0].
Pw2 = 10 kW
n1 = 1000 /min
i = 24
Transmission load is with minor shocks
Standard gearing quality
- Select units and standard [1.1, 1.2]
- Fill in the values Pw, n, i sequentially [1.4, 1.5, 1.7]
- Select load with minor shocks [1.11]
- Select the corresponding gearing quality [1.12]
That is all. You instantly see the dimensions [1.16-1.19] and the estimated weight [1.19].

Try changing the number of worm threads z1 [1.10] using the "-" / "+"
buttons, and you can immediately observe the most important results, including
the dimensional sketch.
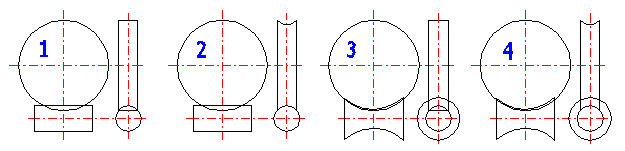
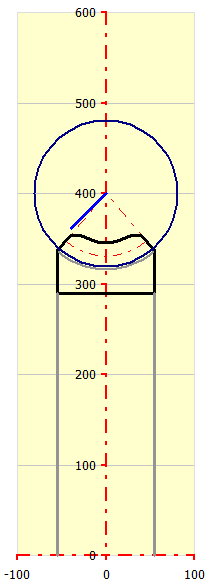
From left to right: z1=1 (efficiency=64.5%, m=125kg), z1=2
(efficiency=77.8%, m=95kg), z1=3 (efficiency=83.3%, m=85kg).
Use the button on the right "[4.0]▼▼" to transfer the values to the main calculation, where you can refine all parameters.
If you need an exact calculation of the worm gearing, want low weight, and high efficiency, use the main calculation and the design of compliant solutions. This allows you to select the gearing that best meets your requirements.
The basic input parameters are the same as in the previous example.
Pw2 = 10kW
n1 = 1000 /min
i = 24
- Select units and standard [1.1, 1.2]
- Fill in the values Pw, n, i sequentially [1.4, 1.5, 1.7]

Add further specifications in paragraph [2.0]
- Material selection
- Precise selection of input and output load characteristics
- Lubrication method, oil properties
- Required service life
- Required safety factors
In paragraph [4.0], set the parameters that the calculation will cycle
through.
- Number of worm threads z1 ... [1-4].
- Range of diameter factor q (worm diameter factor) ... [8-16].
- Parameter by which the table is sorted.
And run the calculation of existing solutions (button on the right). The calculation sequentially goes through all combinations of "z1" and "q", calculates the minimum module that complies with the required safety factors, and places the result in the solution table.

T1: Solution table sorted by weight.
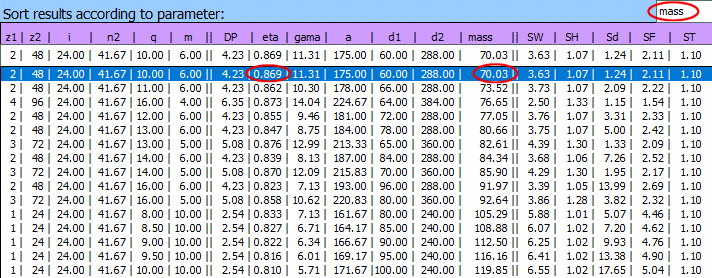
T2: Solution table sorted by efficiency.
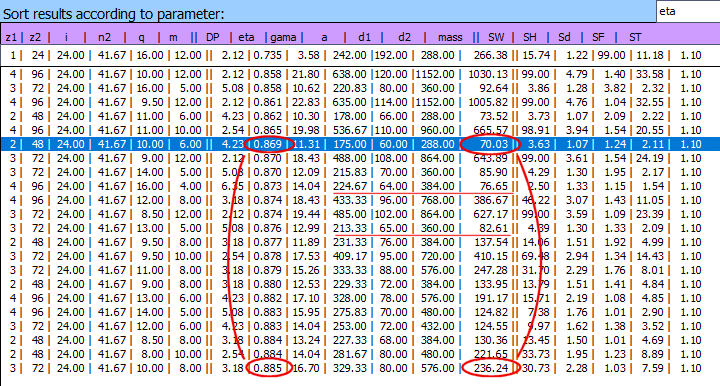
If we compare weight and efficiency, the best solution comes from table T1
(z1=2, z2=48, m=70.03kg).
From table T2 we can see that a 2% better efficiency requires a gear set 3 times
heavier.
From the solution table, you can easily choose the solution that best meets your
requirements (for example, emphasis on center distance).
In further parts of the calculation, you can then specify, for example:
- Bearing span and location (influence on worm deflection safety).
- Exact center distance (design requirement).
- Detailed inspection of safety factors.
Detailed results.
In paragraphs [5.0 - 15.0] you will find exact and detailed calculation
results.
- Dimensions [5.0].
- Efficiency and losses [6.0].
- Calculations of individual safety factors SW, SH, Sδ, SF [7.0 - 10.0].
- Temperature rise inspection [11.0].
Example specified in ISO 14521:2020 - Example I.1
a=100 mm; u=41:2; alfa=20º; mx1=4 mm; P2=4.5kW; n1=1500/min; Lh=2500h; KA=1;
Theta0=20ºC; x2=0;
Polyglicol: ν40=220 ;ν100=37; ρoil15=1.02 kg/l; Material: 16MnCr5-CuSn12Ni2;
Ra1=0.5mm
.....................................................
You can load the complete example input data in paragraph [19.0].
After loading the input data, you can check the calculation results against the results from ISO 14521.
=== Examples from ISO TS 14521:2020 ==============
Example ISO No:1 [Pw2=4.5kW; u=2:41; n1=1500/min; α=20º; mx=4mm; d1=36mm]
Example ISO No:2 [Pw2=0.118kW; u=1:40; n1=150/min; α=20º; mx=2.5mm; d1=28.75mm]
Example ISO No:3 [Pw2=333.372kW; u=4:49; n1=3000/min; α=20º; mx=13.5mm;
d1=135mm]
Example ISO No:4 [Pw2=4.73kW; u=2:39; n1=1500/min; α=20º; mx=4mm; d1=41.12mm]
Example ISO No:5 [Pw2=4.73kW; u=2:39; n1=1500/min; α=20º; mx=4mm; d1=41.12mm]
=== Examples from DIN 3996:2019 ================
Example DIN No:1 [Pw2=4.5kW; u=2:41; n1=1500/min; α=20º; mx=4mm; d1=36mm]
Example DIN No:2 [Pw2=0.118kW; u=1:40; n1=150/min; α=20º; mx=2.5mm; d1=28.75mm]
Example DIN No:3 [Pw2=340.314kW; u=4:49; n1=3000/min; α=20º; mx=13.5mm;
d1=135mm]
=== Examples from AGMA 6134-C21 ===============
Example AGMA No:1 [Pw2=4.244kW; u=1:30; n1=1750/min; α=20º; mx=4.02mm;
d1=38.27mm]
This is a detailed step-by-step guide on how to create a model of the worm,
wheel, and assembly in Autodesk Inventor.
However, the procedure is fundamentally the same for other CAD systems (SolidWorks,
SolidEdge, Creo, etc.).
Do not forget to choose the corresponding model and assembly file types
according to the units used (mm/inch).
Load the gearing parameters from the solution table in paragraph [19.0] (see
the previous example, Example ISO No:1 [Pw2=4.5kW; u=2:41; n1=1500/min; α=20º;
mx=4mm; d1=36mm]).
Set the tooth parameters.
Generate the worm tooth profile into a DXF file.
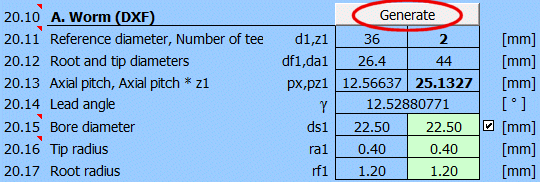
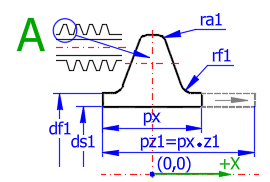
Create a new part Worm.ipt and place a sketch on the XY Plane.
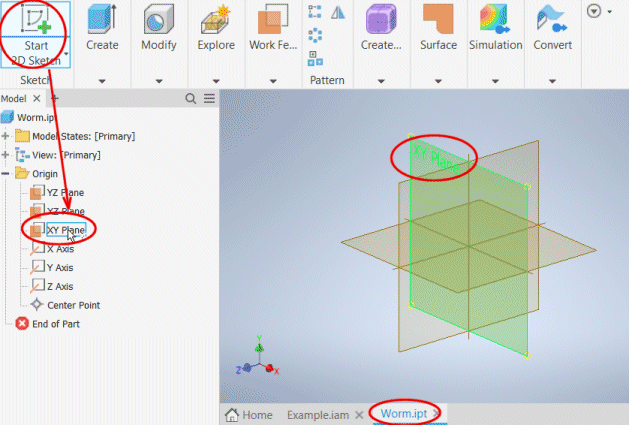
Insert the generated tooth profile from the DXF file into this sketch.
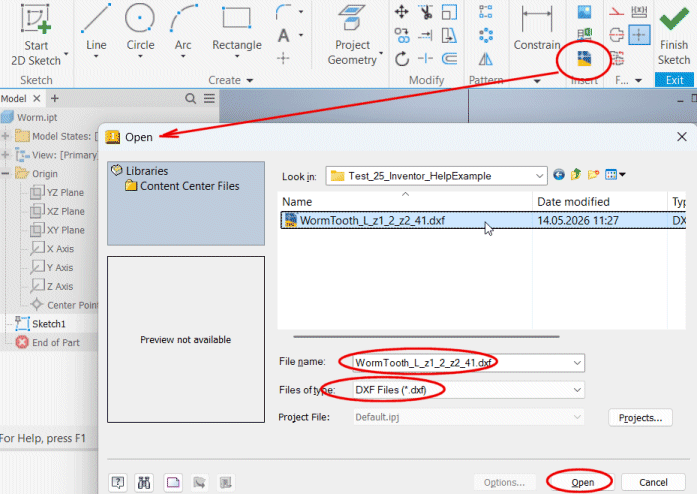
Do not forget the correct units settings and constraint of endpoints.
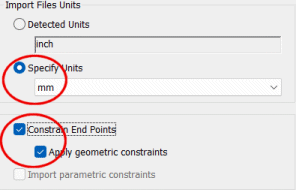
Finish Sketch.
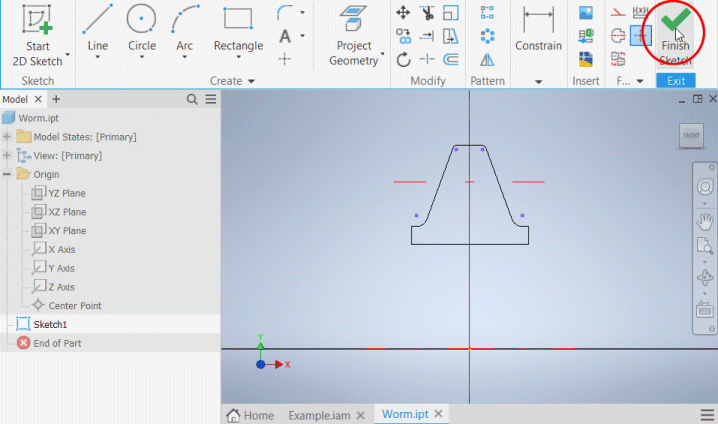
Values required for generating the coil.
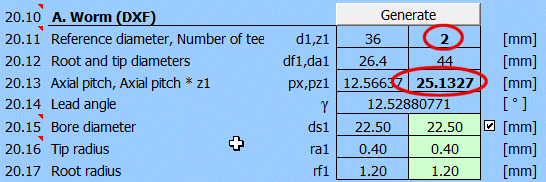
Create a coil (the method for creating a coil may vary across different CAD systems).
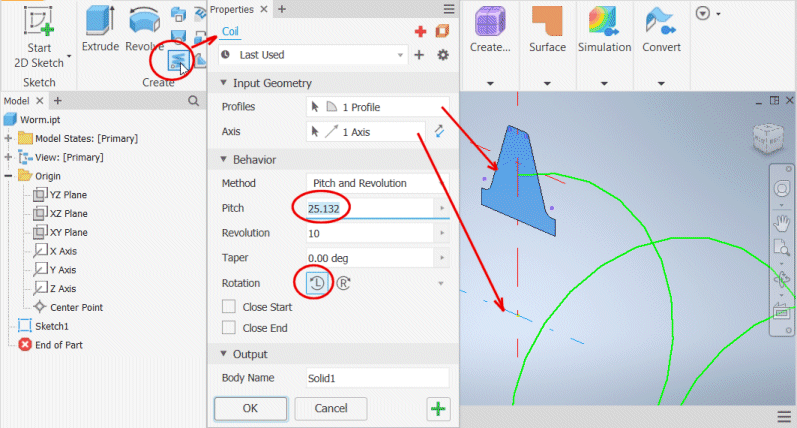
Create a circular pattern of the coil around the X Axis.
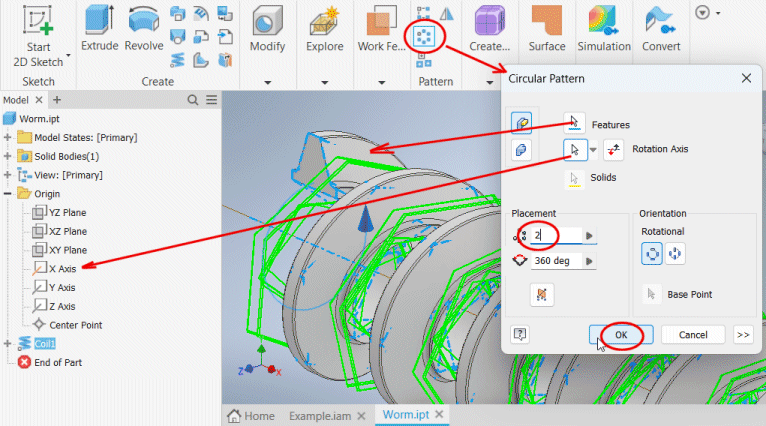
Save the created worm model.
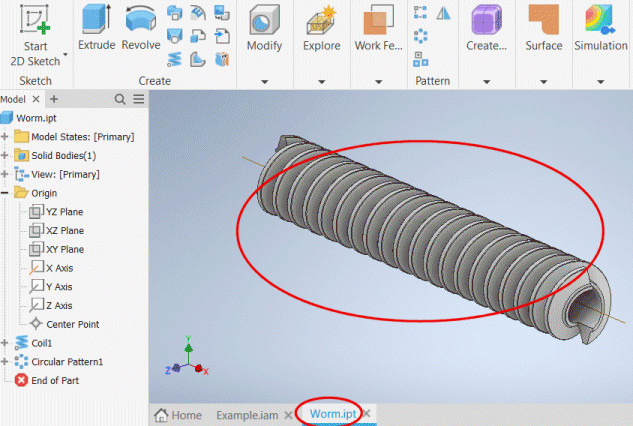
Set the shape of the wheel profile using variables b2R, de2, d2R,
and ds2.
Set the orientation (rotation) of the wheel profile (for Inventor - 270).
Generate the worm tooth profile into a DXF file.
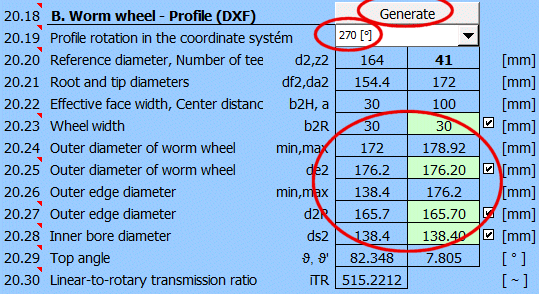
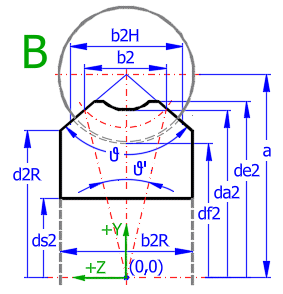
Create a new part Gear.ipt and place a sketch on the YZ Plane.
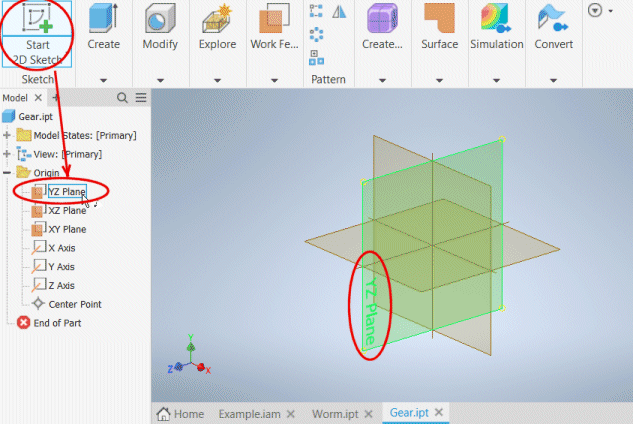
Insert the generated wheel profile from the DXF file into this sketch.
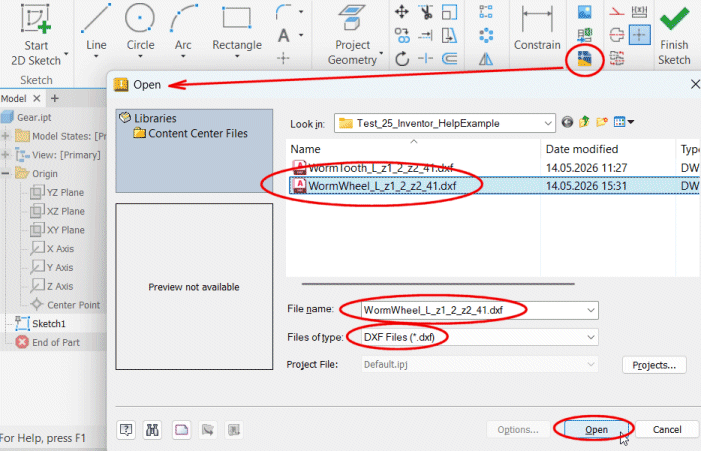
Do not forget the correct units settings and constraint of endpoints.
Finish Sketch.
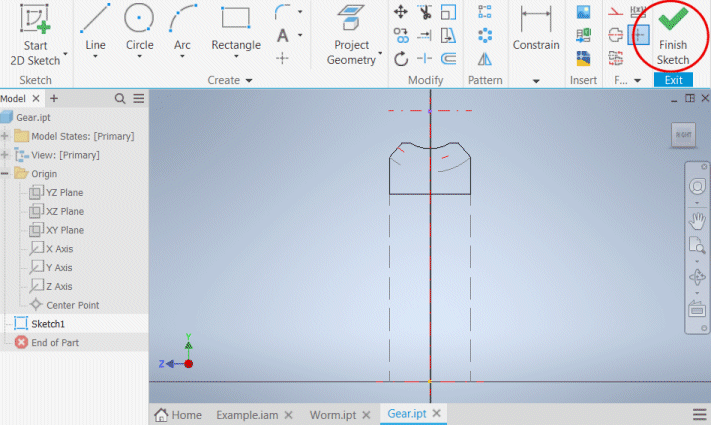
Create a wheel without teeth by revolving the profile around the Z Axis.
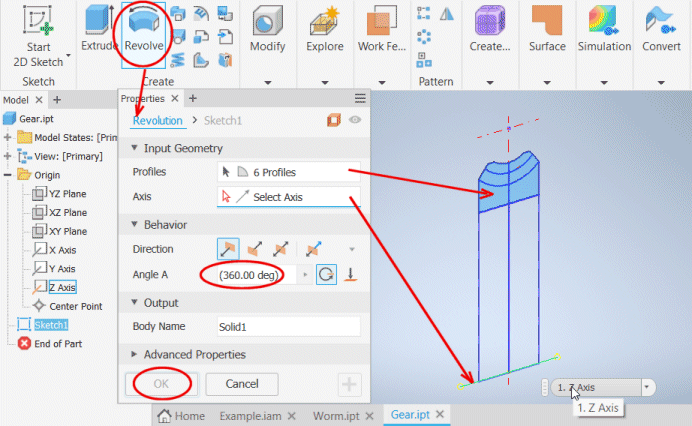
Set the tooth space parameters.
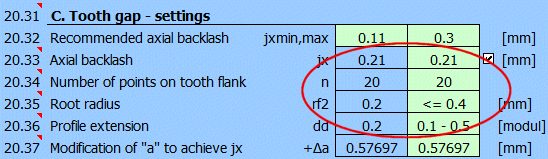
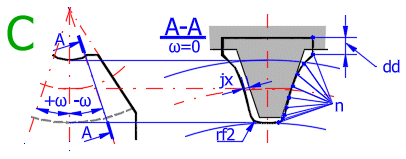
Set the number of generated sections (Fig. C, section A-A).
Set the type of the output file (for Autodesk Inventor - XLSX).
Press the "All" button to generate all sections (individual files) at once.
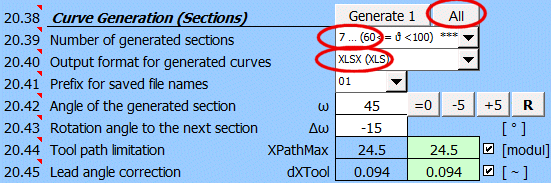
Create individual 3D curves from the generated sections.
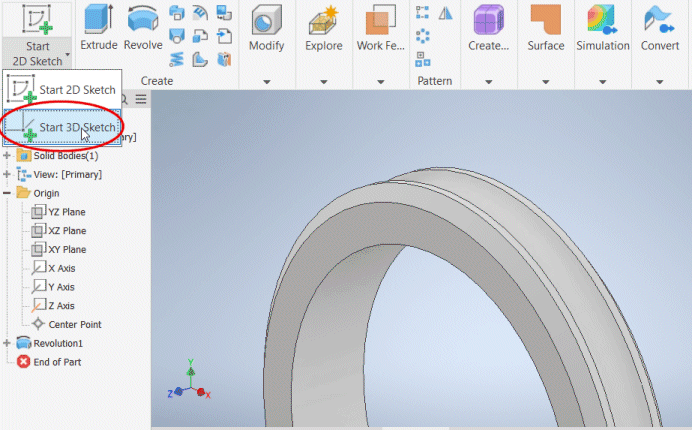
Select the function for importing points.
Set the import to create a "SPLINE".
The generated files (names) end with the angle of the generated section.
Select the outer section and load it into the model.
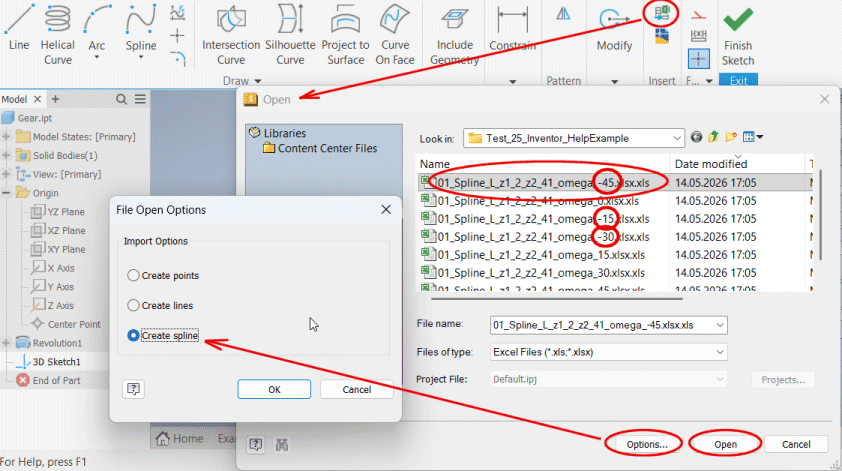
To combine individual curves using the "LOFT" command, the curves
must be closed.
Right-click the curve and select the command to close the curve from the context
menu.
After closing the curve, finish the sketch.
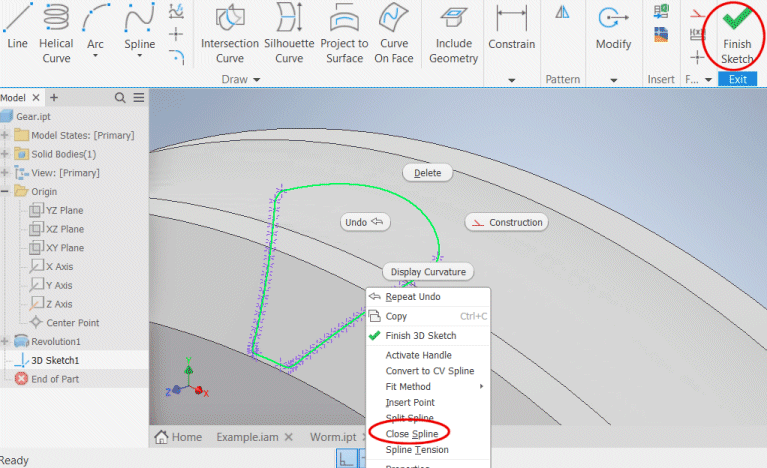
Gradually insert and close the curves for sections -45, -30, -15,
0, +15, +30, +45.
Select the "LOFT" command to combine the curves.
Gradually add the generated curves.
Do not forget to select profile subtraction (Cut) from the worm wheel.
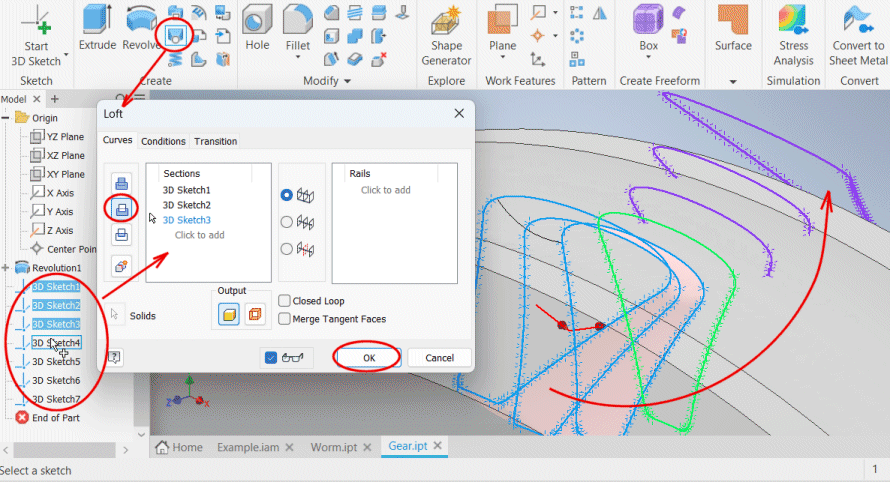
Create a circular pattern from the created tooth space.
Select the space, select the Z Axis.
Enter the number of teeth z2=41.
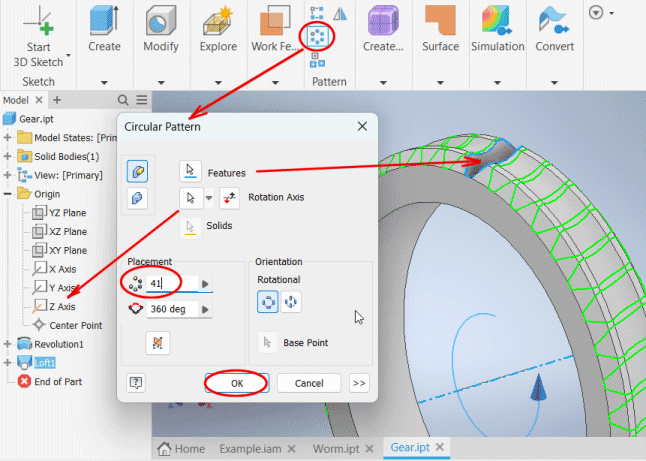
Save the created worm wheel model.
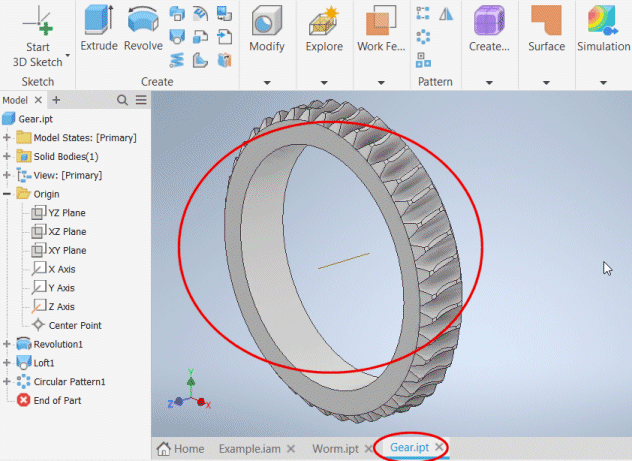
Create an assembly file Example.iam and insert the wheel model.
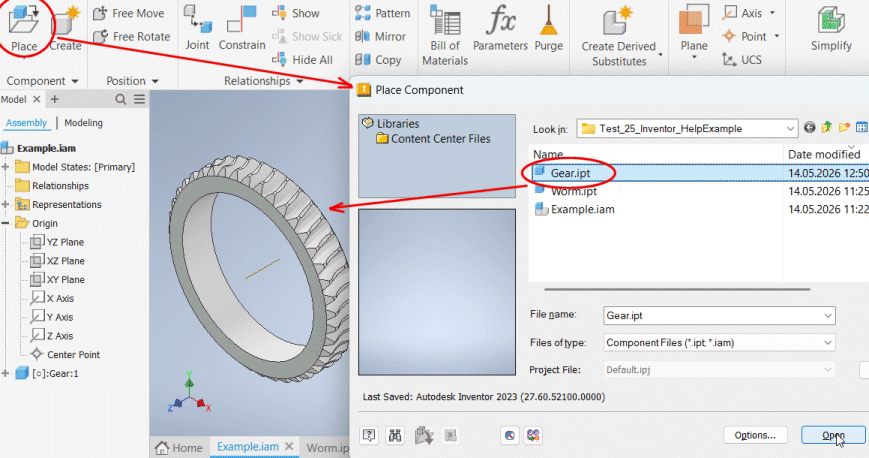
Create a constraint between the Z Axis of the wheel and the Z Axis
of the assembly.
Create a constraint between the XY Plane of the wheel and the XY Plane of the
assembly.
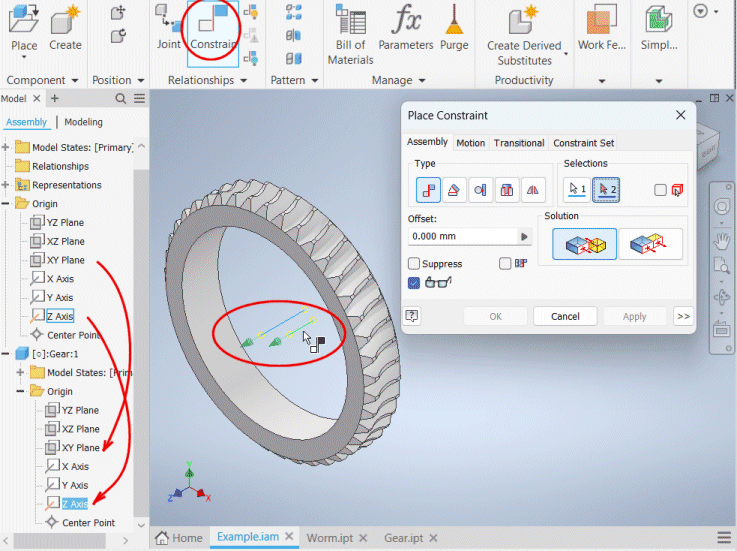
Create a work plane parallel to the XZ Plane of the assembly at
center distance "a".
Create a worm axis in the assembly as an intersection of the work plane and the
XY Plane of the assembly.
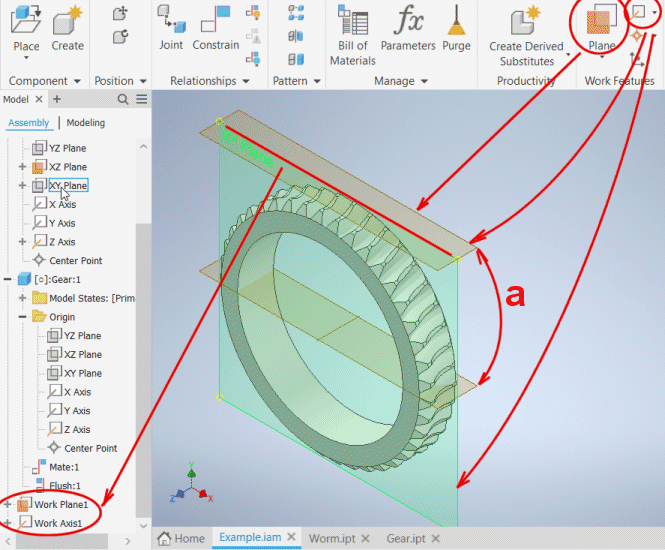
Insert the worm model into the assembly.
Create a constraint between the axis of the inserted worm and the worm axis in
the assembly.
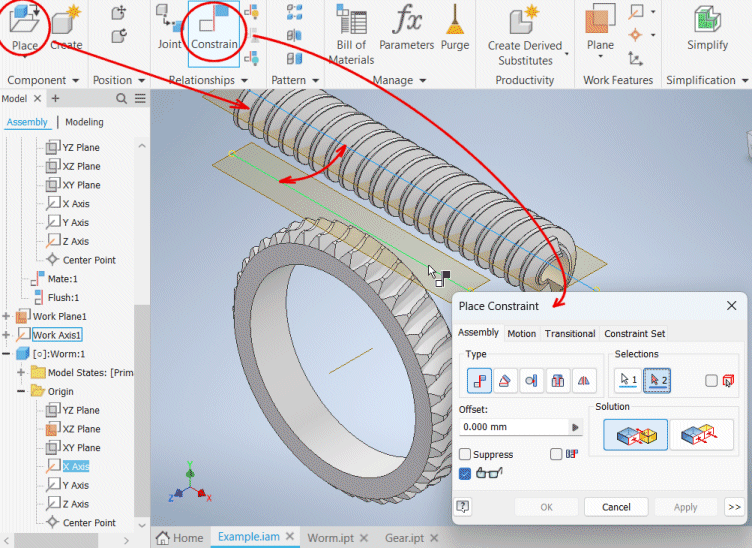
You have created an assembly with a worm and a worm wheel.
Display a section view of the assembly.
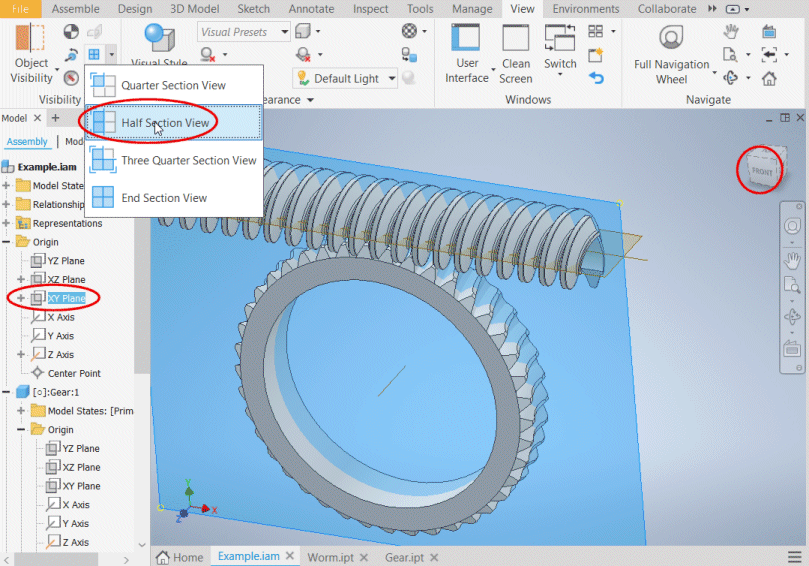
Move the worm so that the worm tooth is positioned in the tooth
space of the wheel.
Perform an interference analysis between the worm and the wheel.
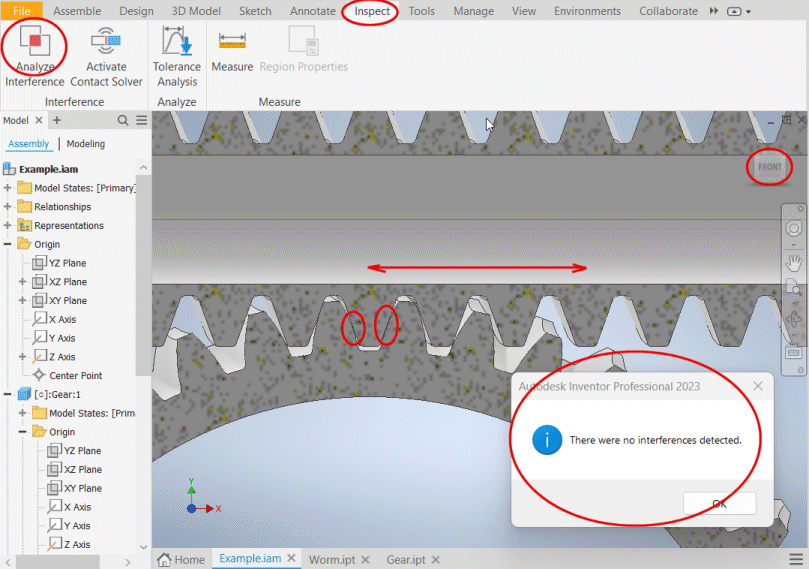
Information on setting of calculation parameters and setting of the language can be found in the document "Setting calculations, change the language".
General information on how to modify and extend calculation workbooks is mentioned in the document "Workbook (calculation) modifications".
Literature:
[01] Industrial Press, Inc.: Machinery’s Handbook 26th Edition
[02] McGraw-Hill: Shigley’s Mechanical Engineering Design, Eighth Edition
[03] Roloff /Matek: Maschinenelemente, 21. Auflage
[04] AGMA, TECHNICAL PAPERS: DIN 3996: A New Standard for Calculating the Load
Capacity of Worm Gears
[05] SVATOPLUK ČERNOCH: Strojně technická příručka
[06] RUDOLF KŘÍŽ, PAVEL VÁVRA: Strojírenská příručka
Standards:
DIN 3996:2019
Tragfähigkeitsberechnung von Zylinder-Schneckengetrieben mit sich rechtwinklig
kreuzenden Achsen
Calculation of Ioad capacity of cylindrical worm gear pairs With rectangular
crossing axes
Calcul de la capacité de charge des engrenages ä vis cylindriques ä axes
orthogonaux
DIN 3974-1, DIN 3974-2
Toleranzen für Schneckengetriebe-Verzahnungen
DIN 3975-1:2002
Definitions and parameters on cylindrical worm gear pairs with rectangular
crossing shafts - Part 1: Worm and worm wheel.
DIN 3975-2:2002
Definitions and parameters on cylindrical worm gear pairs with rectangular
crossing shafts - Part 2: Deviations.
ISO 10828:2024
Worm gears — Worm profiles and gear mesh geometry
Engrenage ä vis cylindriques — Géométrie des profils de vis et de ľengrěnement
ISO/TS 14521:2020
Gears — Calculation of load capacity of worm gears
Engrenages — Calcul de la capacité de charge des engrenages ô vis
ČSN 01 4750:2005
Šnekové převody — Geometrie profilů šneku
Worms gears — Geometry of worm profiles
Engrenages ä vis cylindriques — Géométrie des profils de vis
ANSI/AGMA 6134-C21
(Metric edition of ANSI/AGMA 6034-C21)
American National Standard
Practice for Enclosed Cylindrical Wormgear
Speed Reducers and Gearmotors
(Metric Edition)
ANSI/AGMA 6034-B92
American National Standard
Practice for Enclosed Cylindrical Wormgear
Speed Reducers and Gearmotors
ANSI/AGMA 6022-D19
American National Standard
Standard for Design
Manual for Cylindrical
Wormgearing
^